How to Lay Laminate Flooring: A Step-by-Step Guide


The old carpet is out, the laminate cartons are waiting, and the weekend suddenly looks shorter than expected. For a homeowner in Freehold, Albany, Schenectady or Troy, clicking the boards together is often the straightforward part. The harder decisions happen before installation: whether the subfloor is dry enough, whether the layout leaves sensible cuts, and whether the finished floor can move.
Learning how to lay laminate flooring means treating each stage as a go/no-go check. A failed check calls for a correction, not another board.
Laying Laminate Flooring Step by Step at a Glance
- Expose a sound base. Remove the old floor covering and check that the subfloor is clean, dry, flat and solid. Soft spots and loose panels need repairs before they disappear beneath the new surface.
- Acclimate the cartons. Keep the flooring flat in the installation room for the product's required conditioning period. The room must be at normal living conditions before installation starts.
- Install compatible underlayment. Cover the base continuously and seal joints where the system requires it. Extra cushioning isn't a substitute for proper subfloor preparation.
- Balance the layout. Calculate the finishing-row width and stagger end joints. A deliberate layout avoids fragile slivers and repetitive seams.
- Set perimeter spacers. Leave the specified clearance at every fixed obstruction. A floating floor must remain free to move.
- Connect boards correctly. Use the locking profile's prescribed motion and approved tapping tools. A damaged edge won't become a reliable joint through harder hammering.
- Fit obstacles and transitions. Undercut casings and plan doorway connections without clamping the laminate.
- Finish and inspect. Attach trim to the surrounding structure, remove spacers, clean the floor and follow the product's guidance before returning furniture.
The checks that matter most
Moisture, the perimeter gap and the locking edge decide whether an attractive installation stays serviceable. Product selection matters too, especially for kitchens and lower-level rooms; the guide to choosing laminate flooring helps narrow the options before installation begins.
Consider a hypothetical Freehold homeowner who clicks the starting row tight against the wall, then finds buckling during the first heating season. The symptom warrants a moisture check as well as a clearance check, but proper acclimation and perimeter spacing remove avoidable installation risks.
Before the first cut: A delivery date isn't proof that the room is ready.
Questions can be brought to the Freehold, NY showroom before the first board goes down. Family-owned Tip Top Furniture & Flooring has been in business since 1978, with local guidance for homeowners throughout the Greater Albany Capital Region.
Prepare the Room, Subfloor and Underlayment
A room can look ready while its subfloor still has a hollow, loose section or trapped moisture. Check the room conditions, the base and the underlayment assembly in that order. Each check is a go/no-go: resolve a failed one before moving on.
Keep the laminate in its unopened cartons for at least 48 hours at 15–22°C and 30–75% relative humidity, following the manufacturer's laminate installation instructions. If the room's humidity falls outside that range, those instructions advise extending acclimation to one week and opening the packages. Keep cartons flat and away from exterior walls. Go/no-go: Proceed only when the room and cartons meet the product's acclimation requirements.
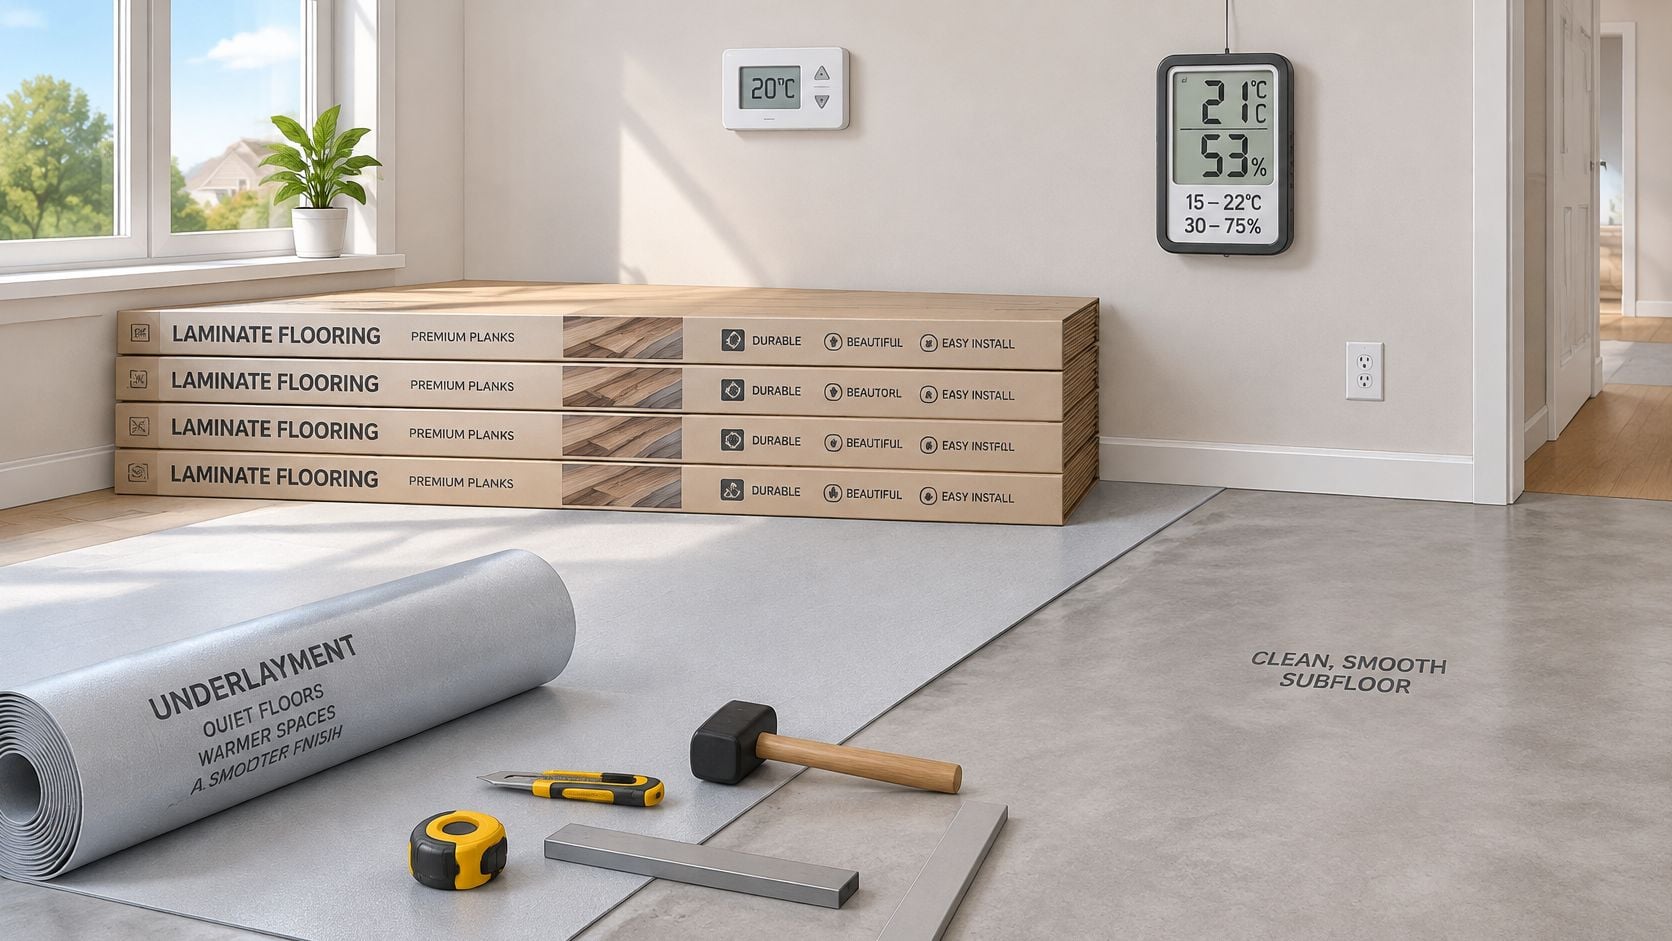
Pass the flatness and moisture checks
Remove existing coverings, vacuum the base and secure loose subfloor sections. Run a long straightedge across the room, checking seams and open areas for humps or depressions. A consistent slope can meet a product's flatness requirement, while a localized hollow can let a plank flex. Use the manufacturer's subfloor preparation guide for the applicable flatness limits, then confirm the limits for the flooring you purchased.
Subfloor limits to check before laying
| Subfloor type | Maximum limit | Action if exceeded |
|---|---|---|
| Concrete or general subfloor | 4 mm over 2 m or 1 mm over 20 cm | Grind or sand suitable high spots and apply smoothing compound to low spots |
| Wood subfloor | 2 mm over 1 m for standard underlay | Use approved specialized underlay, leveling compound, plywood or OSB |
| Concrete moisture | Below 5 lb per 1,000 sq ft per 24 hours, or below 80% in-situ RH | Don't lay; wait for drying or treat the slab first |
| Wood moisture content | 12% or less | Let the subfloor dry and retest before laying |
The concrete figures are screening limits, not a substitute for the flooring manufacturer's requirements. Use a calcium-chloride test for concrete moisture-vapor emissions, an in-situ probe for humidity within the slab and a wood-moisture meter for wood. Confirm that the selected method and acceptable reading match the product instructions. A plastic-sheet test can flag a possible moisture issue, so follow up with an approved test before laying. A damp basement slab in February needs investigation before it is covered.
Go/no-go: If the subfloor exceeds the flooring's moisture limit, stop. Dry the substrate or use an approved mitigation system, and repair any active leak before installation.
Approve the underlayment assembly
Follow the manufacturer's laminate installation guidance for compatible, continuous underlayment and sealed joints. Some wood-subfloor applications have exceptions. Check whether the assembly includes a vapor barrier and whether planks with an attached pad allow another layer of underlayment.
Go/no-go: Lay the first board only after the subfloor passes its checks and the underlayment assembly matches the product instructions.
Gather Tools, Measure the Room and Set the Expansion Gap
Before cutting planks, map the room and check the flooring manufacturer's installation sheet. Expansion clearances vary by product and room size, and a long run may also need a transition break.
Expansion gap by room size
| Room condition | Typical perimeter gap |
|---|---|
| Standard room up to 25 ft wide and 40 ft long | 10 mm (3/8 in.) |
| Room between those sizes | 10–12 mm, product-specific |
| Room over 40 ft in length or width | About 12 mm (1/2 in.); check transition requirements |
These are planning ranges, not a substitute for the product's instructions. The manufacturer's general laminate installation instructions specify the clearance for the flooring they cover. Use the matching product guidance to set spacers before laying boards.
Assemble tools before opening the first row
Gather the tools and protection the job calls for:
- Layout: Tape measure, pencil, square, straightedge and spacers.
- Joints: A compatible tapping block and pull bar.
- Cuts: Fine-tooth saw or jigsaw, plus a flush-cut or oscillating saw for casings.
- Underlayment: Utility knife and specified seam tape.
- Protection: Eye and hearing protection, suitable dust protection and dust extraction.
Use a scrap board to check saw settings and locking technique. If a trial piece is damaged, discard it rather than hiding the defect under furniture.
Calculate across the rows
Measure the room in several places. Walls often run out of parallel, so use the smallest cross-room measurement when planning the final row. Measure along the rows separately to plan end cuts and staggering.
For example, a hypothetical 14-foot cross-room measurement is 168 inches. With 3/8 inch allowed at each side, the usable width is 167.25 inches. Dividing by 7.5-inch planks leaves 22 full widths and a 2.25-inch finishing strip.
Trimming 1.5 inches from the starting-row width would bring the finishing strip to 3.75 inches, half a plank. Check doorways, irregular walls and the manufacturer's minimum cut width before settling on that layout.
A narrow finishing strip is easier to prevent on paper than to fix after installation. Allow extra material for cuts, defects and future repairs, especially around angled walls and complicated doorways. Check carton labels for consistency. A paper sketch helps plan board placement; Tip Top's free online room planner can help check how furniture will fit in the finished room.
How to Lay the First Rows Without Trapping the Floor
A starting row that drifts out of line makes every later joint harder to close. Start from the longest dependable reference wall, and verify it with a straightedge. If the wall bows, scribe the boards to follow its shape while keeping the installed row straight.
Use the expansion gap set in the previous section, and keep the floor free to move. Spacers can hold the clearance at the perimeter while the first rows are assembled.
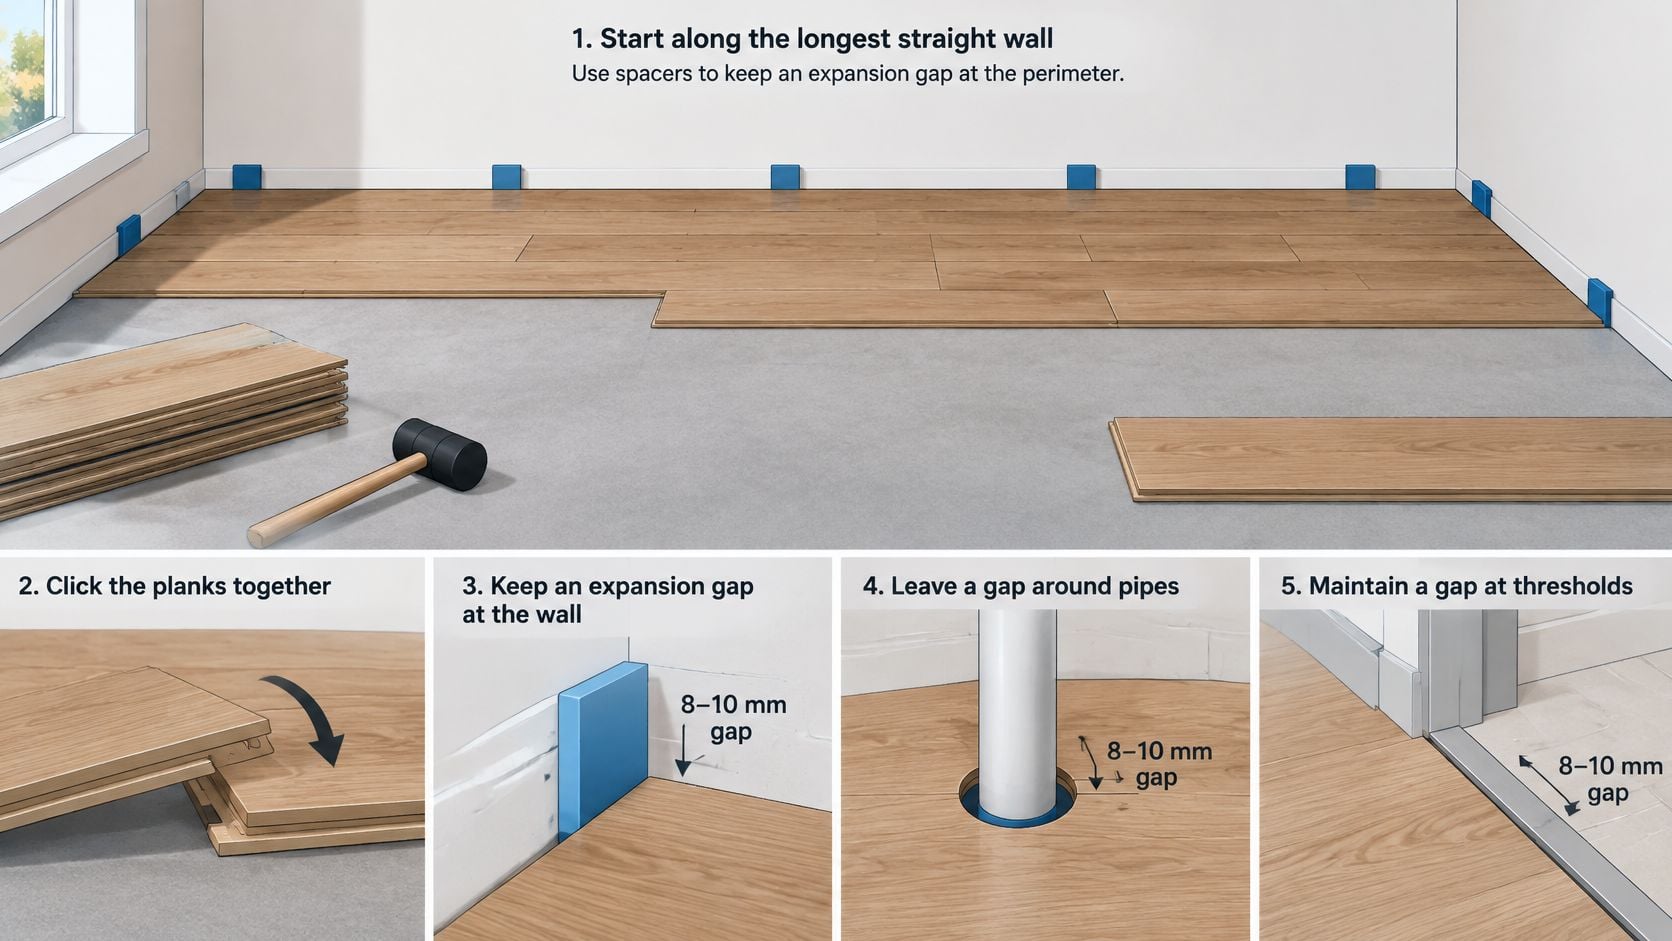
Check each connection before continuing
- Confirm board orientation. Check which tongue and groove edges face the room, then assemble the starting boards in the order specified for the locking system.
- Follow the locking motion. Raise and lower each plank at the prescribed angle. End joints may lock differently from long edges.
- Close the joint gently. Use a tapping block only if the product instructions permit it. A direct hammer blow can damage the locking profile while leaving the surface looking intact.
- Set the next-row offset. Choose a starting length that meets the product's minimum end-joint offset. Keep end joints from forming a repeating stair-step pattern unless the layout calls for one.
- Check alignment and seams. Run a straightedge along the connected rows and inspect the joints in good light. If a seam stays open, lift and inspect the connection rather than forcing it shut.
- Confirm the row is free to move. Check that spacers remain in place and that debris is clear from the perimeter.
Laminate's wood-based core responds to changes in indoor humidity. A row that fits tightly during installation can press against its boundaries as conditions change.
Go/no-go: Continue only when each joint lies flat, closes properly and has no damaged locking edge. Replace a plank with a chipped lock before laying the next board.
Finish the perimeter with baseboard molding that conceals the clearance, without fastening through or pressing tightly onto the floating floor.
Cutting, Fitting and Finishing Around Obstacles
Awkward cuts deserve a dry fit before the board joins the installed floor. Mark the waste side clearly and support the plank during cutting. A cosmetic filler pen can disguise a small surface chip, but it can't repair a broken locking edge.
Door casings and pipes
For a casing, place a scrap plank on the specified underlayment beside the jamb and use that assembly to establish the undercut height. Cut the casing, clear the waste, then test whether the plank slides underneath without binding. Clearance must remain behind the casing, even though it won't be visible.
For radiator pipes, measure the pipe center from stable reference points and transfer the location carefully. The opening must accommodate the pipe diameter plus the required movement clearance on both sides. A decorative rosette covers the opening without fastening the floor to the pipe or subfloor.
Doorways, cabinets and appliances
- Doorway transitions: Select a profile suited to the adjoining floor heights. Attach its track to the substrate as designed, keeping fasteners out of the laminate and leaving space beneath the cover for movement.
- Cabinet toe kicks: Finish against fixed cabinetry with concealed clearance. Permanent cabinets shouldn't trap a floating installation.
- Appliance spaces: Follow the product's appliance and load restrictions. Check that the finished height still permits appliance removal and door operation.
- Stairs: A floating room-floor method doesn't transfer directly to a staircase. The guide to laminate flooring for stairs addresses the separate attachment and nosing considerations.
Trim attaches to the wall or appropriate fixed structure. Shoe molding should cover the opening without being forced downward against the boards.
Stop-and-check point: A hidden edge still needs movement space. Concealing a tight fit doesn't make it acceptable.
Wear eye and hearing protection and use appropriate dust protection and extraction when cutting. Disconnect power before changing blades or making adjustments, keep hands outside the blade path, and support long pieces with a helper. Lift cartons close to the body rather than twisting with the load.
Troubleshooting Buckling, Gaps and Indoor Air After Installation
A lifted floor needs a cause-specific repair. Check for a tight perimeter, a pinned transition or fasteners through the laminate, then investigate moisture and subfloor conditions. Use the symptom as a guide, not as proof of the cause.
Match the symptom to the check
| Symptom | Likely causes to investigate | Sensible next action |
|---|---|---|
| Buckling or tenting | Restrained perimeter, pinned transition or moisture | Remove trim for inspection, check moisture and release restraints without damaging the floor |
| Open end joints | Damaged locks, movement, poor assembly or changing humidity | Stabilize conditions and inspect the connection before attempting an approved repair |
| Squeaks or movement near seams | Loose subfloor, uneven support or unsuitable underlayment | Locate the support problem; lifting boards may be necessary |
| Swollen edges | Water exposure or unsuitable cleaning | Stop the water source and assess whether affected boards need replacement |
| Widespread lifting | Extensive restraint, moisture or substrate failure | Stop use of the affected area and arrange professional assessment |
For a squeak, locate the source before choosing a repair. A screw through the finished laminate can pin the floating floor, and a shim beneath a joint can concentrate stress on a vulnerable lock. Check the support below the boards and repair that problem using a method suited to the floor's construction.
For winter gaps, compare indoor humidity with the flooring manufacturer's operating range. Restore suitable room conditions, then inspect the joints. A fractured lock needs an approved repair or board replacement; humidity control cannot fix it. See the guide to laminate flooring replacement to assess whether the damage is localized or points to a wider installation failure.
Protect the surface and manage indoor air
Put felt pads beneath furniture legs, lift heavy pieces rather than dragging them, and wipe spills promptly. Use a steam mop only if the flooring manufacturer approves it. Clean with the products and method specified for the floor.
The EPA indoor-air exposure assessment identifies laminate flooring as a contributor to residential formaldehyde exposure and models emissions that can peak after installation, then decline during the first year. The assessment does not set one safe re-entry interval for every room or product.
Ventilate with outdoor air when practical, maintain normal temperatures and avoid unnecessarily heating the newly installed room. Households with infants, pregnant occupants or people with asthma or other respiratory sensitivities can use another room temporarily and follow product-specific guidance.
If lifting returns within a heating season after the perimeter restraint has been released, call a flooring professional to check for moisture or substrate problems. Recurring dampness or persistent irritation also calls for professional assessment, not a cosmetic patch.
Decide Whether to Lay It Yourself or Hire a Pro
A written installation estimate helps you compare the cost of hiring a professional with the time and tools a DIY job requires. One market report estimates U.S. laminate flooring installation at $3.00–$8.00 per square foot in 2025, including materials and labor, according to Dataintelo's laminate flooring market report. For a hypothetical 300-square-foot room, that works out to $900–$2,400. Check whether the estimate includes trim, removal, subfloor repairs and moisture treatment.
Use the room, not confidence, to decide
Treat each choice as a go/no-go check before moving ahead:
- DIY may suit the job if the substrate passes testing, the room layout is straightforward, the tools are available and you have time to work without rushing.
- Get a professional assessment if the subfloor needs substantial correction, the layout has difficult angles or doorway connections, or you find moisture from a basement or slab.
- Pause before buying materials or laying boards if a test fails and the cause is unclear. A dehumidifier can lower indoor humidity, but the source of persistent moisture still needs to be identified.
Compare flooring types and their pros and cons before committing to laminate, especially if the room's conditions may favor another material.
Tip Top Furniture's Floor Covering and Window Treatment department offers estimates and in-house measuring. Use that service to clarify the room's dimensions and project scope before scheduling work.
Professional Design Services have been available since 1984. For flooring needs, Tip Top coordinates with local partners.
If you are considering professional installation, ask for a written scope before agreeing to a price. If you plan to lay the floor yourself, proceed only when the room and subfloor checks pass.
To arrange in-house measuring, contact Tip Top Furniture & Mattresses in Freehold, NY, and have your room dimensions, doorway photos and moisture-test results ready.