Baseboard Molding Installation A Pro’s Guide
You’ve painted the walls, the floor is down, and the room looks close. Then your eye keeps dropping to that rough line where the wall meets the floor. That’s where baseboards earn their keep.
In a lot of Albany-area and Greene County homes, baseboard molding installation isn’t a neat little Saturday project pulled from a generic tutorial. Older houses move. Floors sag. Corners drift out of square. Walls belly in and out. If you treat an old Upstate New York house like brand-new construction, the trim will tell on you right away.
That’s also why this part of the job matters so much. Baseboards don’t just hide expansion gaps and protect drywall edges. They frame the whole room. When they fit tight, the room feels settled and finished. When they don’t, even good paint and beautiful furniture can look slightly off.
Why Perfect Baseboards are the Ultimate Finishing Touch
A room can be well furnished and still feel unfinished if the trim work is sloppy. Baseboards create the visual stop at floor level. They clean up the transition, protect the wall, and give the room a deliberate edge that reads as finished craftsmanship instead of “almost done.”
That last detail matters even more in older homes across the Capital Region. A 2023 Houzz report noted that 68% of homeowners in the Northeast face trim fitting challenges because of wall imperfections, and the same source notes that installers often use composite shims before installation because Fine Homebuilding tests showed 20% better adhesion with that approach in problem areas (Bend Tool Co. summary). That tracks with what shows up in older farmhouses, capes, and mid-century homes around Albany, Troy, and Greene County. The house itself usually decides how easy this job will be.
Why this detail changes the whole room
Baseboards do three jobs at once:
- They hide the meeting point between floor and wall, where seasonal movement and imperfect cuts would otherwise show.
- They protect the lower wall from vacuums, shoes, chair legs, and everyday traffic.
- They visually anchor the room so paint, flooring, and furniture feel tied together.
A good install doesn’t call attention to itself. You notice the room, not the trim. That’s the mark of a pro finish.
Practical rule: If your eye goes to the joints, the gaps, or the waviness at the floor line, the baseboards are still doing too much talking.
Old-house reality in Upstate New York
Most online guides assume straight walls and square corners. That’s rarely the job in this region. In older homes, the better approach is patience, dry-fitting, and problem-solving before the nail gun comes out. Sometimes that means shimming behind the trim. Sometimes it means scribing the bottom edge. Sometimes it means giving up on a “perfect” miter and switching to a cope.
If you want the room to stay sharp after installation, upkeep matters too. A practical guide on the best ways to clean baseboards is worth bookmarking once the work is done, especially if you’ve chosen a taller profile that tends to catch dust along the top edge.
Trim also works best when it supports the rest of the room design instead of fighting it. If you’re coordinating molding with a stronger wall treatment, it helps to think through the whole composition first, especially with ideas like a perfectly balanced accent wall.
Gathering Your Tools and Choosing Materials
Good trim work starts before the first cut. If your tools are wrong, your material is poorly chosen, or you’re making store runs halfway through the job, the install gets slower and the finish gets rougher.
The cleanest baseboard molding installation usually comes from a simple setup used well. You don’t need a truck full of gear. You do need tools that cut accurately, fasten consistently, and let you adjust for old-house surprises.
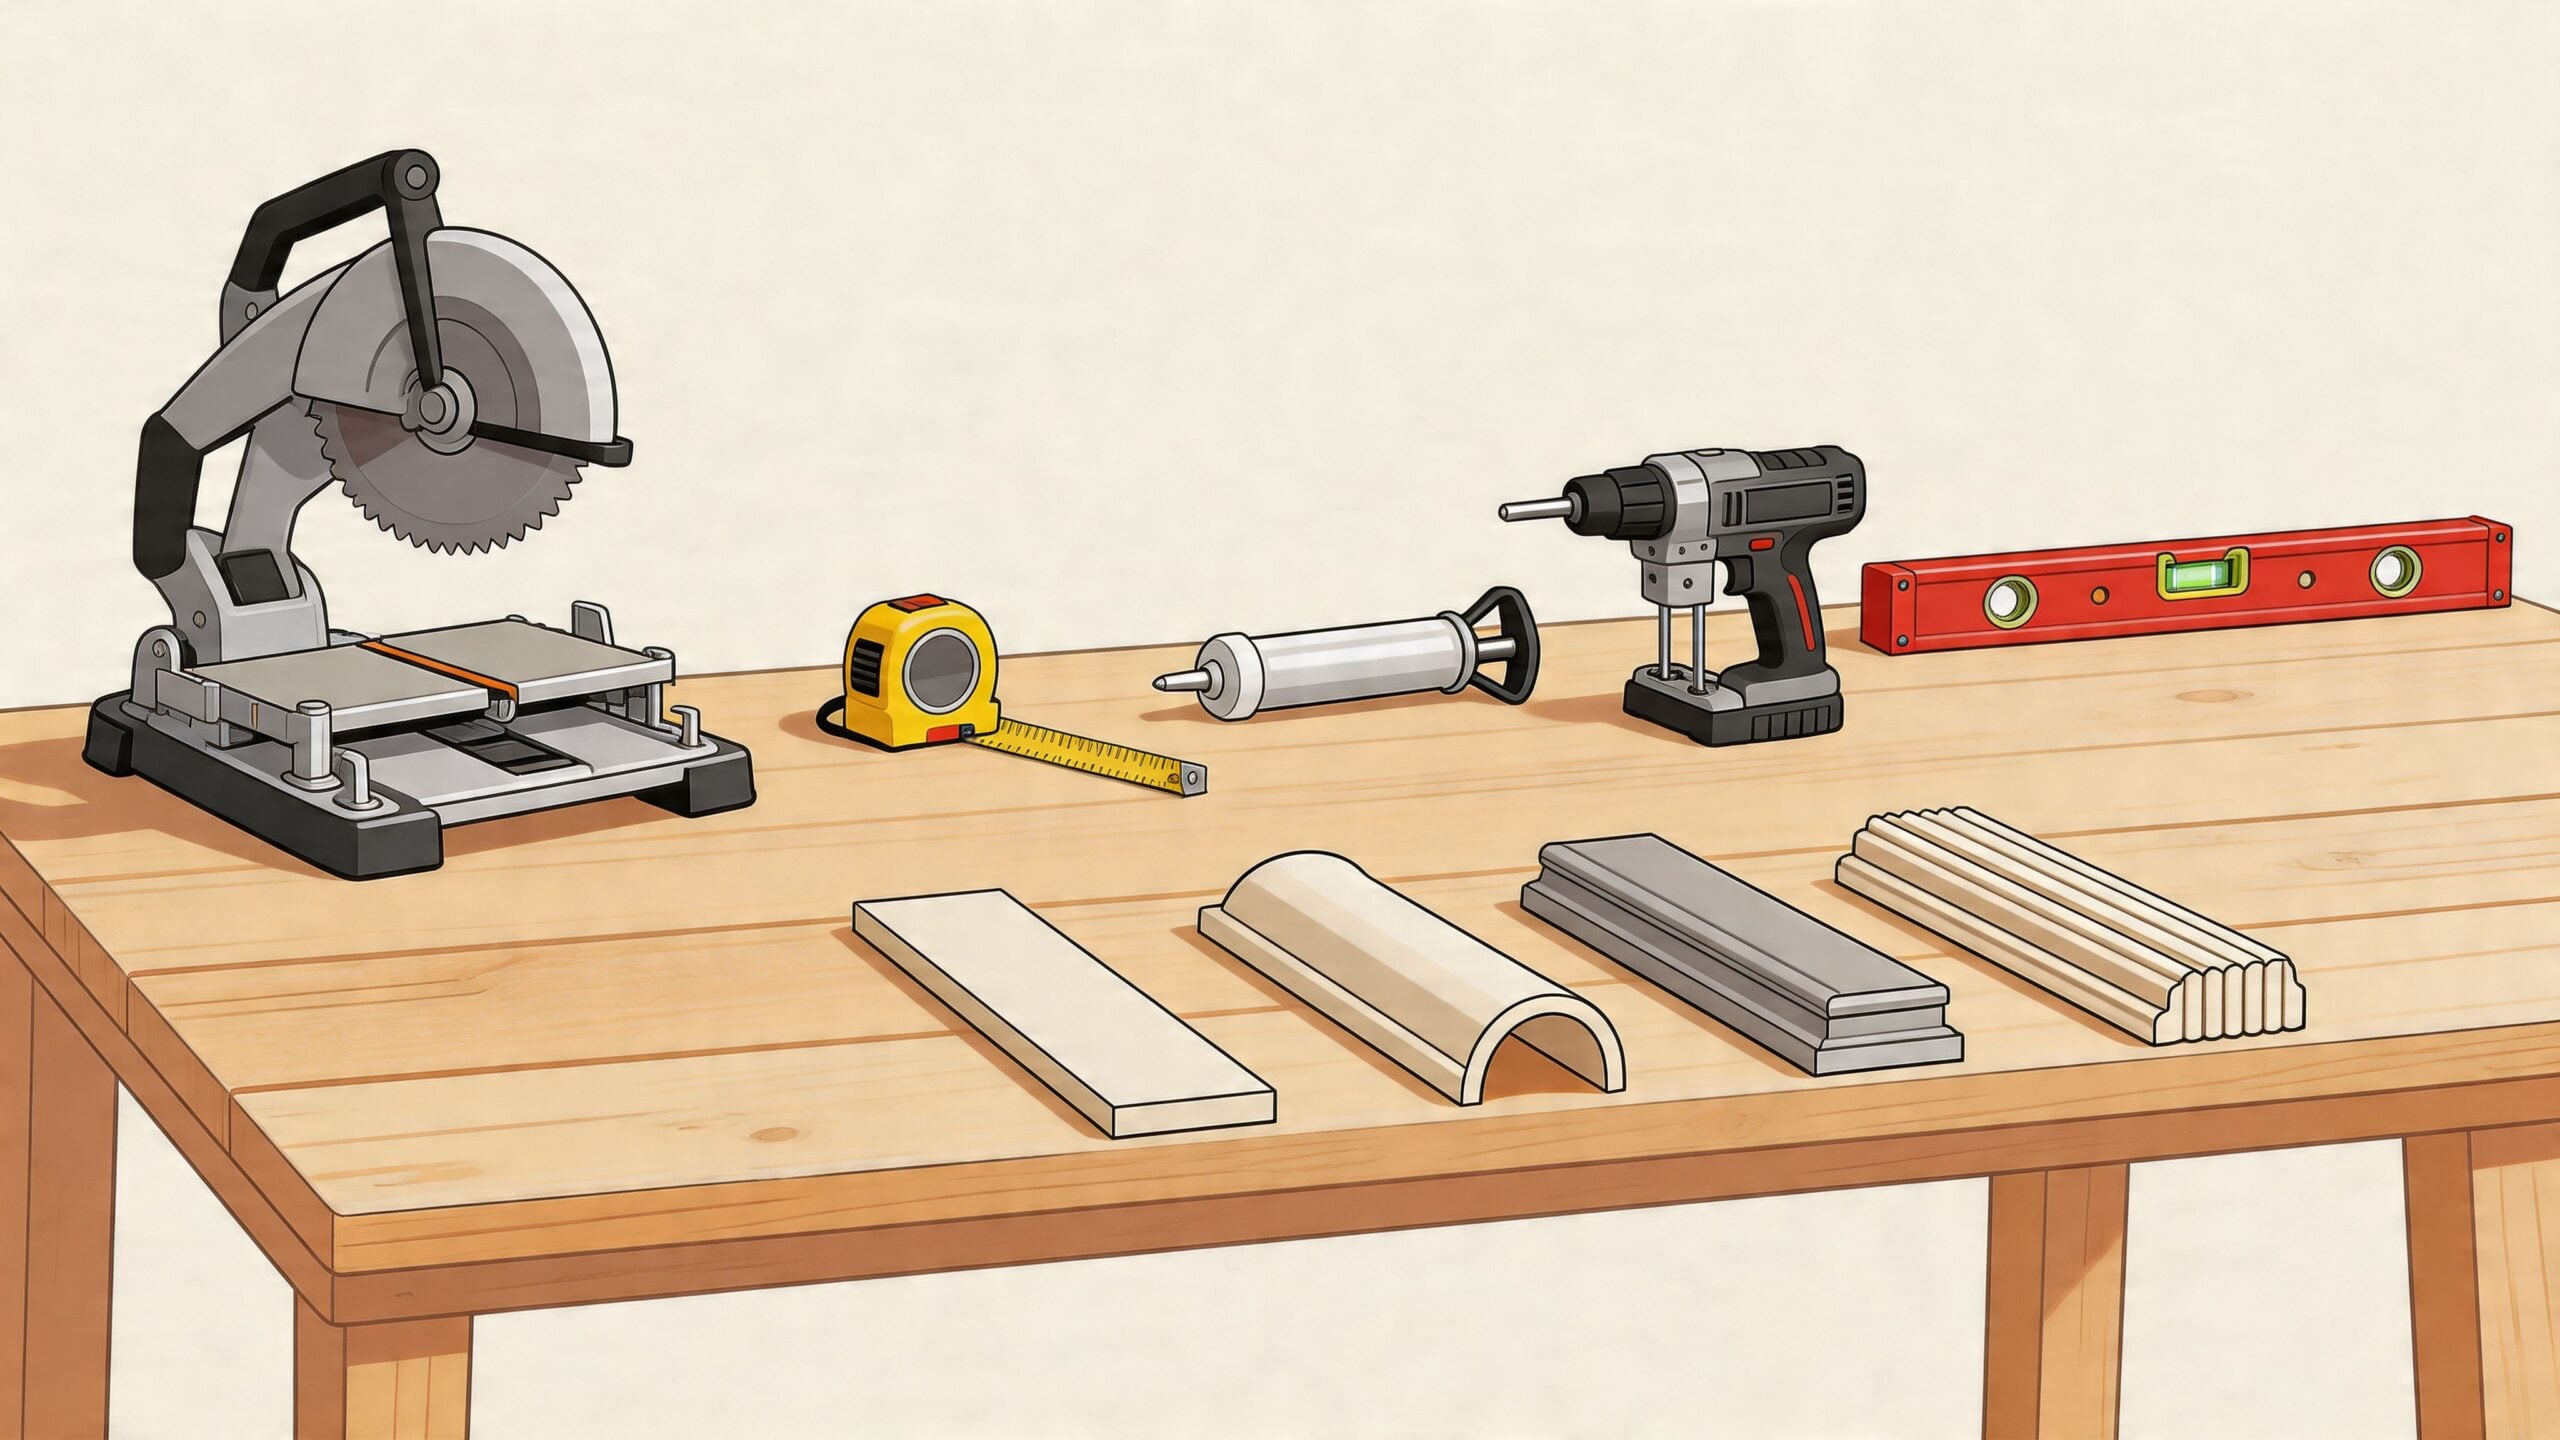
The core tool kit
At minimum, keep these on hand before you start:
- Miter saw for square cuts, outside miters, and scarf joints.
- Coping saw for inside corners that won’t stay tight with a basic miter.
- Brad nailer for fast, controlled fastening.
- Tape measure and pencil for layout.
- Stud finder for marking solid nailing points.
- Level or laser level for checking reveal and wall drift.
- Caulk gun for finish work.
- Nail set if you’re doing any hand nailing or need to sink a proud fastener.
- Sandpaper for tuning coped joints and easing cut edges.
- Utility knife for scoring caulk lines or trimming paint buildup.
- Compass or scribing tool for uneven floors.
A vacuum helps more than people expect. Sawdust under a board during dry-fit can throw off the read on a joint.
Small supplies that make the job look better
Most trim projects go sideways on the “little stuff,” not the main boards. Keep these nearby:
- Wood filler or lightweight patch for nail holes
- Paintable acrylic caulk where trim meets wall
- Construction adhesive for select spots where backing is weak
- Shims for walls that bow or dip
- Primer and trim paint if the boards aren’t prefinished
- Drop cloths and painter’s tape to keep the room from looking like a shop floor
Keep one scrap offcut beside the saw. It’s the fastest way to test angles, check blade accuracy, and practice a cope before you touch the actual piece.
Choosing between MDF and wood
Material changes both the look of the room and the way the install behaves.
Here’s the practical breakdown:
| Material | Where it works well | What to watch for |
|---|---|---|
| MDF | Painted rooms, consistent profiles, budget-conscious projects | Heavier than it looks, doesn’t like moisture, edges can swell if abused |
| Pine | Traditional painted trim, easy cutting, forgiving for DIY work | Softer surface, dents more easily |
| Poplar | Smooth painted finish, stable, a good step up from pine | Costs more than pine |
| Hardwood | Stained trim or higher-end custom work | Harder to cut and tune, usually less forgiving on mistakes |
If the room is getting painted trim, MDF or poplar are common picks because they leave a clean face. If the goal is more character, especially where the trim is meant to relate to solid wood furnishings, real wood often feels more at home.
Profile matters as much as material
A flat board reads cleaner and more modern. A rounded, stepped, or sculpted profile feels more traditional. In an old house, simple profiles are often easier to fit because there’s less detail to distort when the wall isn’t straight. Ornate profiles can look beautiful, but they demand tighter cuts and more careful coping.
Wood movement matters too. If you’re comparing species and trying to understand how lumber behaves before it becomes trim or furniture, this guide on what kiln-dried wood is gives useful background.
What works in older homes
In an older Albany-area home, I lean toward materials and profiles that tolerate adjustment. A very delicate profile can look great in the showroom and turn fussy on a wavy plaster wall. A cleaner profile with enough thickness to scribe and enough face to nail well tends to install better and stay better.
That’s the trade-off. The fanciest profile isn’t always the one that gives the best result in a real house.
The Foundation Measuring Layout and Preparation
In a lot of Albany and Greene County houses, the trouble starts before the first cut. You pull a board tight to the wall and find a belly in the plaster. You set it on the floor and see daylight under one end. The room looked square enough until the tape and level said otherwise.
That is why layout matters so much. Good prep gives you a fighting chance in an older Upstate home, where the walls and floors have had 60 or 100 winters to move around.
Measure each wall for the room you actually have
Measure every wall separately. Opposite walls are often off by enough to matter, and inside corners that look similar can be different by a degree or two. On baseboard, that small difference shows.
Make a quick sketch and note more than length. Mark door casings, floor vents, radiators, tight returns, and any spot where a full board cannot run cleanly. On long walls, pick the scarf joint location early so it lands where it will be less noticeable.
A lot of homeowners already have this habit from planning furniture. The same discipline from measuring a room for furniture properly carries over here. Read the room first, then trust the tape.
One more thing I always check in older homes is floor height at several points along the same wall. If the floor rises or drops, you want to know that before you start cutting trim to a perfect length that only fits in one exact spot.
Mark studs before you carry in a stack of trim
Find and mark every stud center before installation. Light pencil marks just above the trim line work well because they stay visible while you fit boards and disappear once the job is finished.
Stud marks save time, but they also help with board position. In older houses, plaster can be uneven, and sometimes the best-looking fit comes from pulling one section tighter while letting another section sit naturally against the wall. If you already know where the framing is, you can make those adjustments without guessing.
Drywall alone does not hold baseboard well for long, especially through heating season. A board that feels tight on install day can loosen after a few cycles if the fasteners are not hitting framing consistently.
Prep the wall, floor, and old trim line
Before new baseboards go up, clean up what the old ones left behind. Scrape off caulk ridges, loose paint, old adhesive, and any lumps that will hold the new board away from the wall.
Then check the floor. A small hump can force the top of the baseboard away from the wall. A dip can leave a shadow line at the bottom edge. Neither problem is unusual in this area, especially in older homes with settled framing or patched subfloors.
Corners deserve a close look too. Some inside corners are tight at the bottom and open at the top. Others are the reverse. If you catch that now, you can plan the cut and the installation sequence instead of discovering the problem with wet glue or a loaded nailer in your hand.
If you are removing old trim, take your time. A stiff putty knife behind the pry bar helps protect plaster, and that matters in older houses where wall repairs can snowball fast.
Dry-fit in sequence, not all at once
I do not recommend cutting an entire room of baseboard before fitting anything unless the room is unusually straight. In most older Capital Region homes, that approach creates a pile of almost-right parts.
A better rhythm is simple:
- Measure the wall
- Check the floor and corner condition
- Mark the stud locations
- Cut one board for that spot
- Dry-fit it on the wall
- Tune the fit, then fasten
Start with the most visible wall, or with the wall that teaches you the most about how the room is behaving. Once you know whether the corners are open, the floor is rolling, or the plaster bows in the middle, the rest of the room gets easier.
This is the stage where good trim work stays honest. If a board needs a little scribing, a slight adjustment in length, or a different joint location, make that call here. It is a lot better than trying to hide a bad fit later with caulk and paint.
Mastering the Cuts Mitering Coping and Scarf Joints
Most trim jobs are won or lost at the saw. The cut can be technically correct and still wrong for the room if the wall leans, the corner is open, or the floor throws the board out of line.
There are three cuts that do nearly all the work in baseboard molding installation. Learn these well and the rest of the project gets much easier.
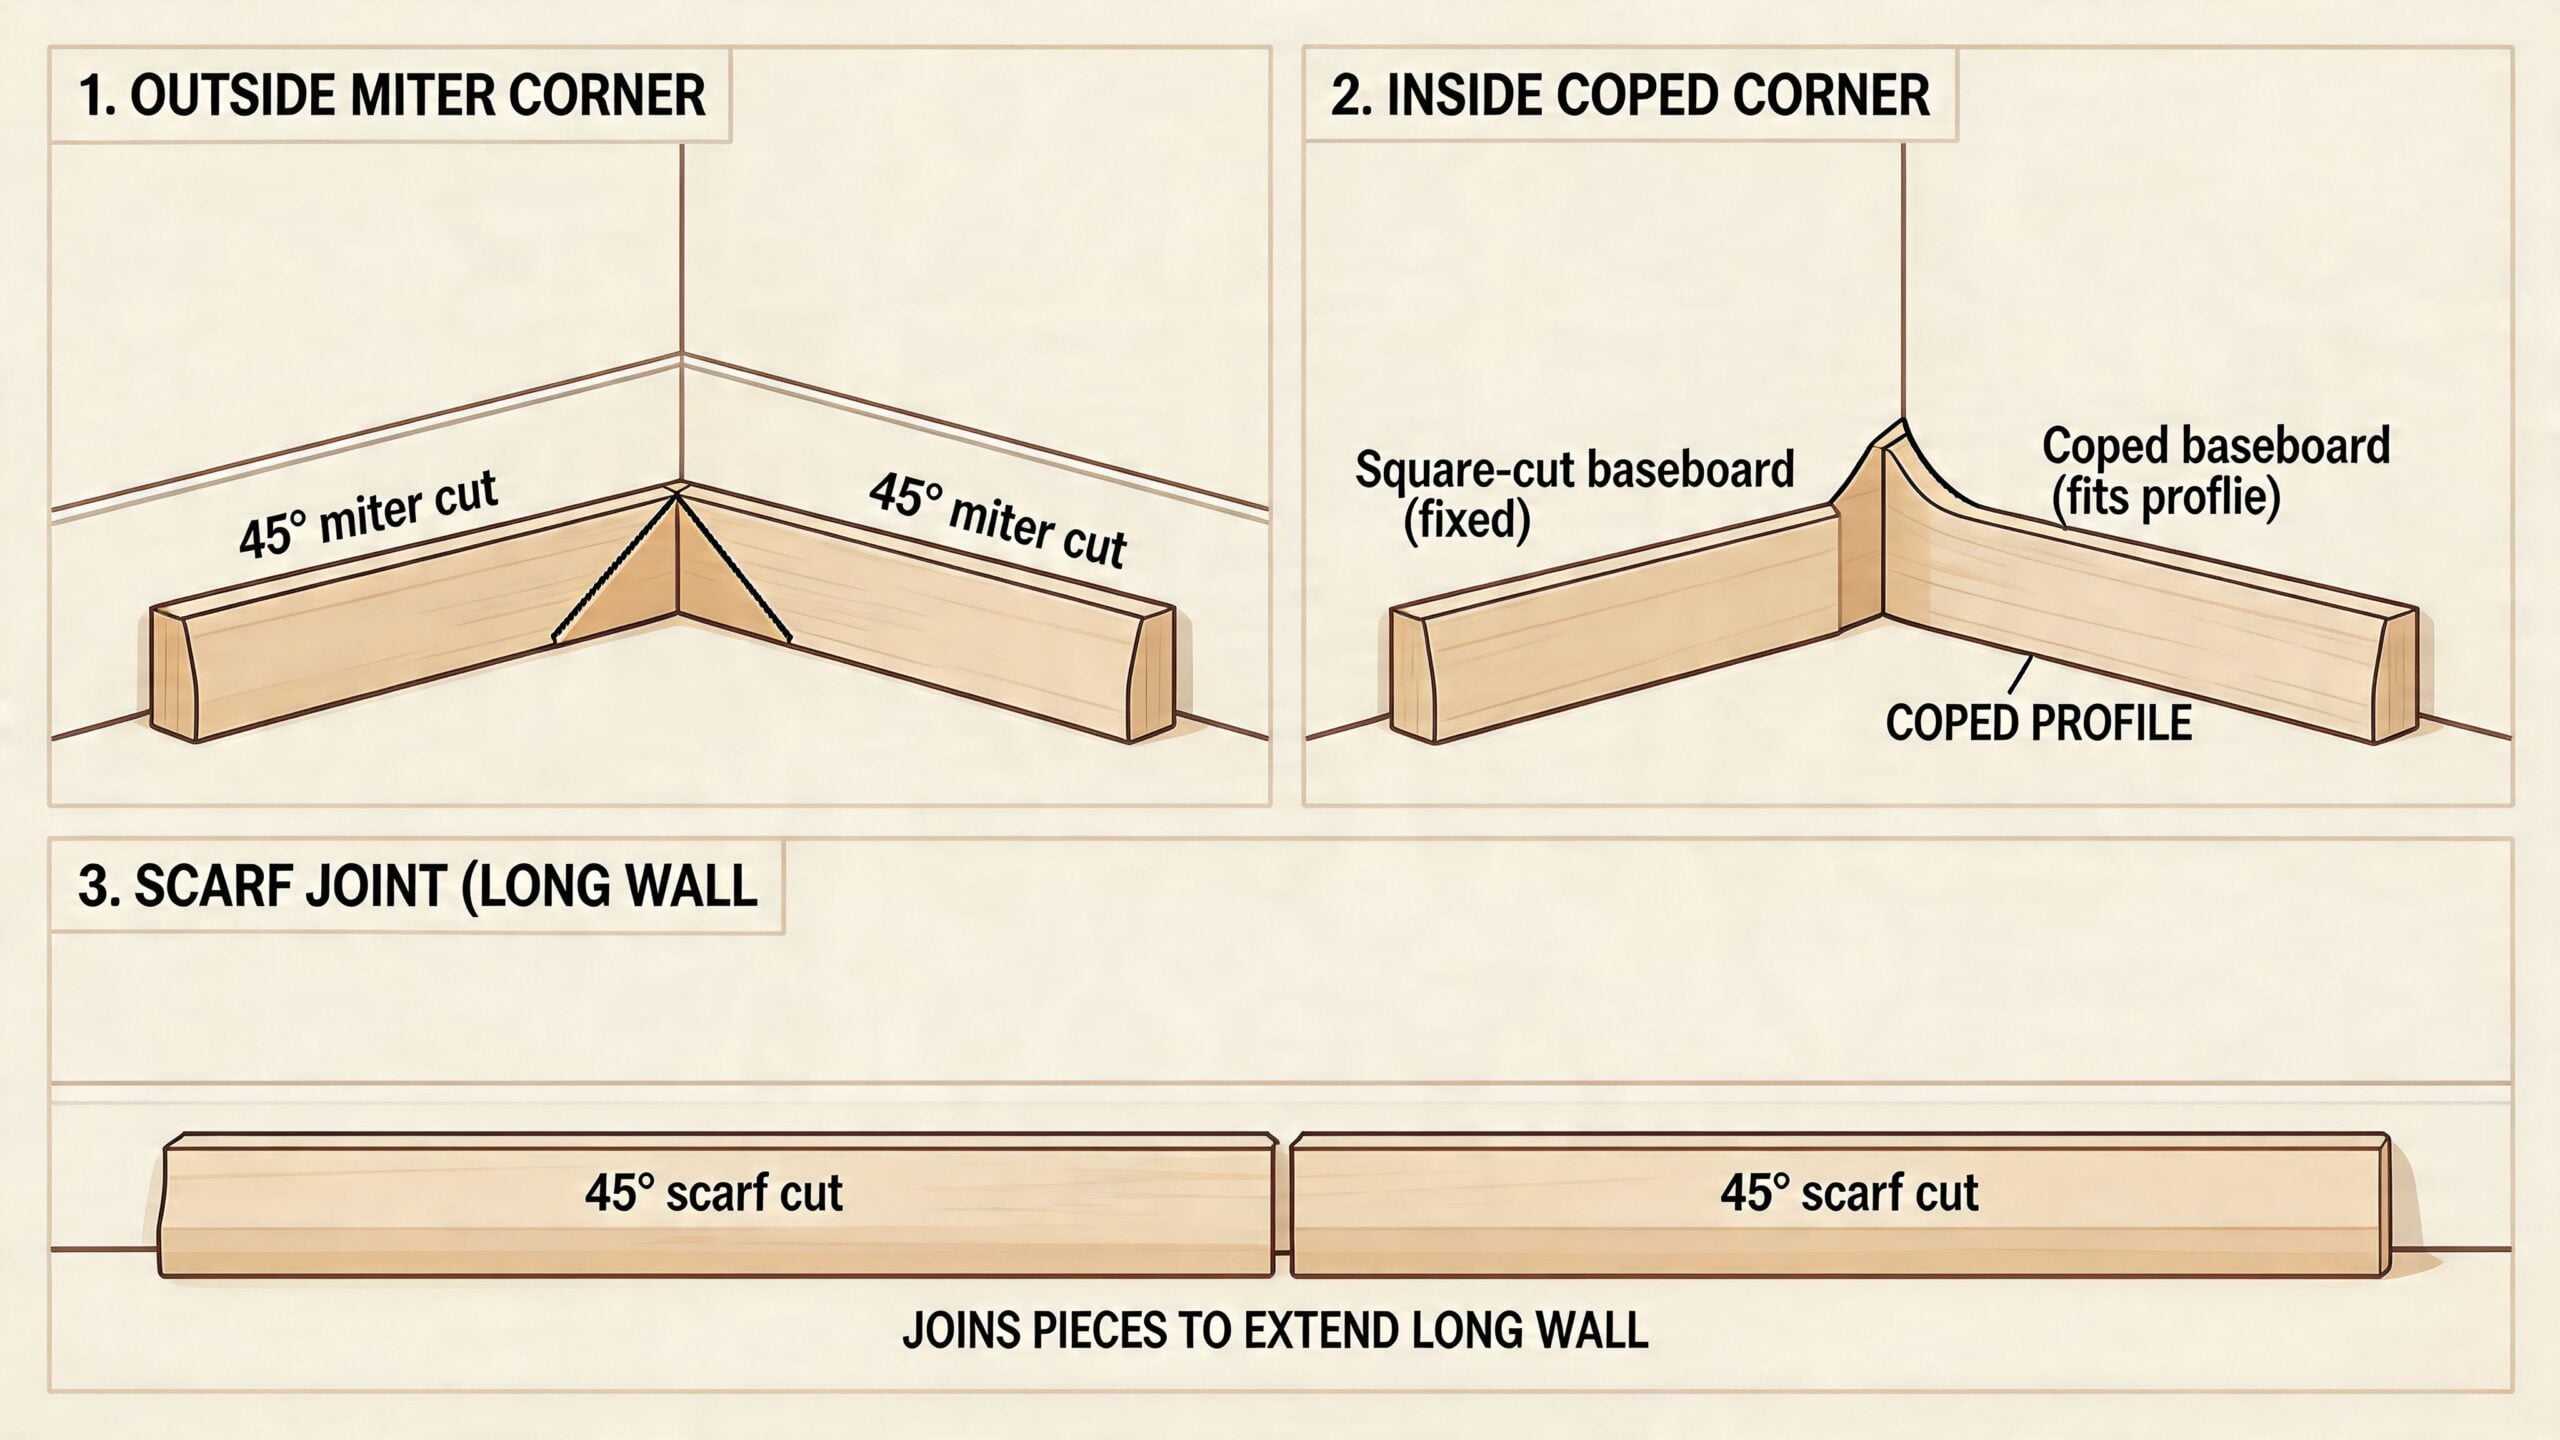
Outside corners need accuracy
Outside corners are the clean, visible points that everyone notices. A standard approach is two opposing miter cuts that meet to form the corner. The trick is that outside corners in real homes are rarely perfect either, so a saw set to a textbook angle may still need tuning.
A few habits help:
- Cut one side slightly long and sneak up on the fit.
- Check the corner on the wall, not just against another scrap on the saw stand.
- Watch the top edge first because that’s where light catches an opening.
If the wall corner is battered or rounded from years of use, you may need to split the difference visually rather than chase a mathematically perfect point.
Inside corners should usually be coped
Often, DIY installs get into trouble with inside corners. New installers often miter inside corners because it seems simpler. In old houses, it usually isn’t.
Expert carpenters prefer coping joints for inside corners because they can accommodate up to 5-degree wall angle variances without visible gaps. DIY surveys indicate that 45-degree mitered inside corners fail in 60-70% of installations due to wall imperfections, and coping reduces rework by an estimated 80% according to the installation guidance summarized by The Home Depot.
That’s why pros cope. One board runs square into the corner. The mating board is cut to follow the actual profile of the first piece. It lets the joint stay tight even when the corner itself isn’t.
How to make a coped joint
The sequence matters more than speed.
- Cut the first board square and install or dry-fit it tight into the corner.
- Cut the mating board with a miter that exposes the profile.
- Follow that profile with a coping saw, removing the waste behind the face.
- Back-cut slightly so the front edge contacts first.
- Sand and test-fit until the profile closes neatly against the first board.
Beginners usually remove too much material too quickly. Work small. A few passes with sandpaper are safer than one aggressive cut that ruins the face.
A good cope touches at the visible front edge. The back of the joint can have relief. The front cannot.
Common cutting mistakes in old houses
Older homes force you to read the room, not the printed angle mark on the saw.
Watch for these trouble spots:
- Ceiling or floor movement changing the wall line so the board twists slightly as it meets the corner
- Plaster buildup in the lower corner that blocks the trim from seating fully
- Layered paint on old trim returns or casings that changes the meeting point
- Relying on factory ends that aren’t always dead square
A quick test with a scrap piece saves expensive mistakes, especially on sculpted profiles.
Scarf joints for long runs
When one wall is longer than your stock length, you’ll join two boards with a scarf joint. That’s an angled splice, usually set so the joint is less noticeable once painted and viewed from the room.
The best scarf joints share a few traits:
- They land over solid backing when possible
- The angles are clean and matching
- The joint is glued lightly if appropriate
- The seam faces away from the most common sightline
Don’t place a scarf joint where afternoon light rakes across it if you can avoid it. Light reveals everything.
The real trade-off between fast and good
You can blast through baseboard cuts and get trim on the wall quickly. In a newer room, you might get away with it. In an older Capital Region house, speed usually shows up later as caulked gaps, split corners, and joints that open when the heat kicks on.
Patience at the saw is cheaper than repair after paint.
Attachment Finishing and Professional Touches
A lot of baseboard jobs in Albany-area homes go sideways after the cuts are done. The boards fit well enough, then the installer rushes the fastening, chases gaps with caulk, and leaves a finish line that looks soft instead of sharp. In older houses with wavy plaster and tired floors, the last 10 percent decides whether the room feels cleaned up or still a little off.
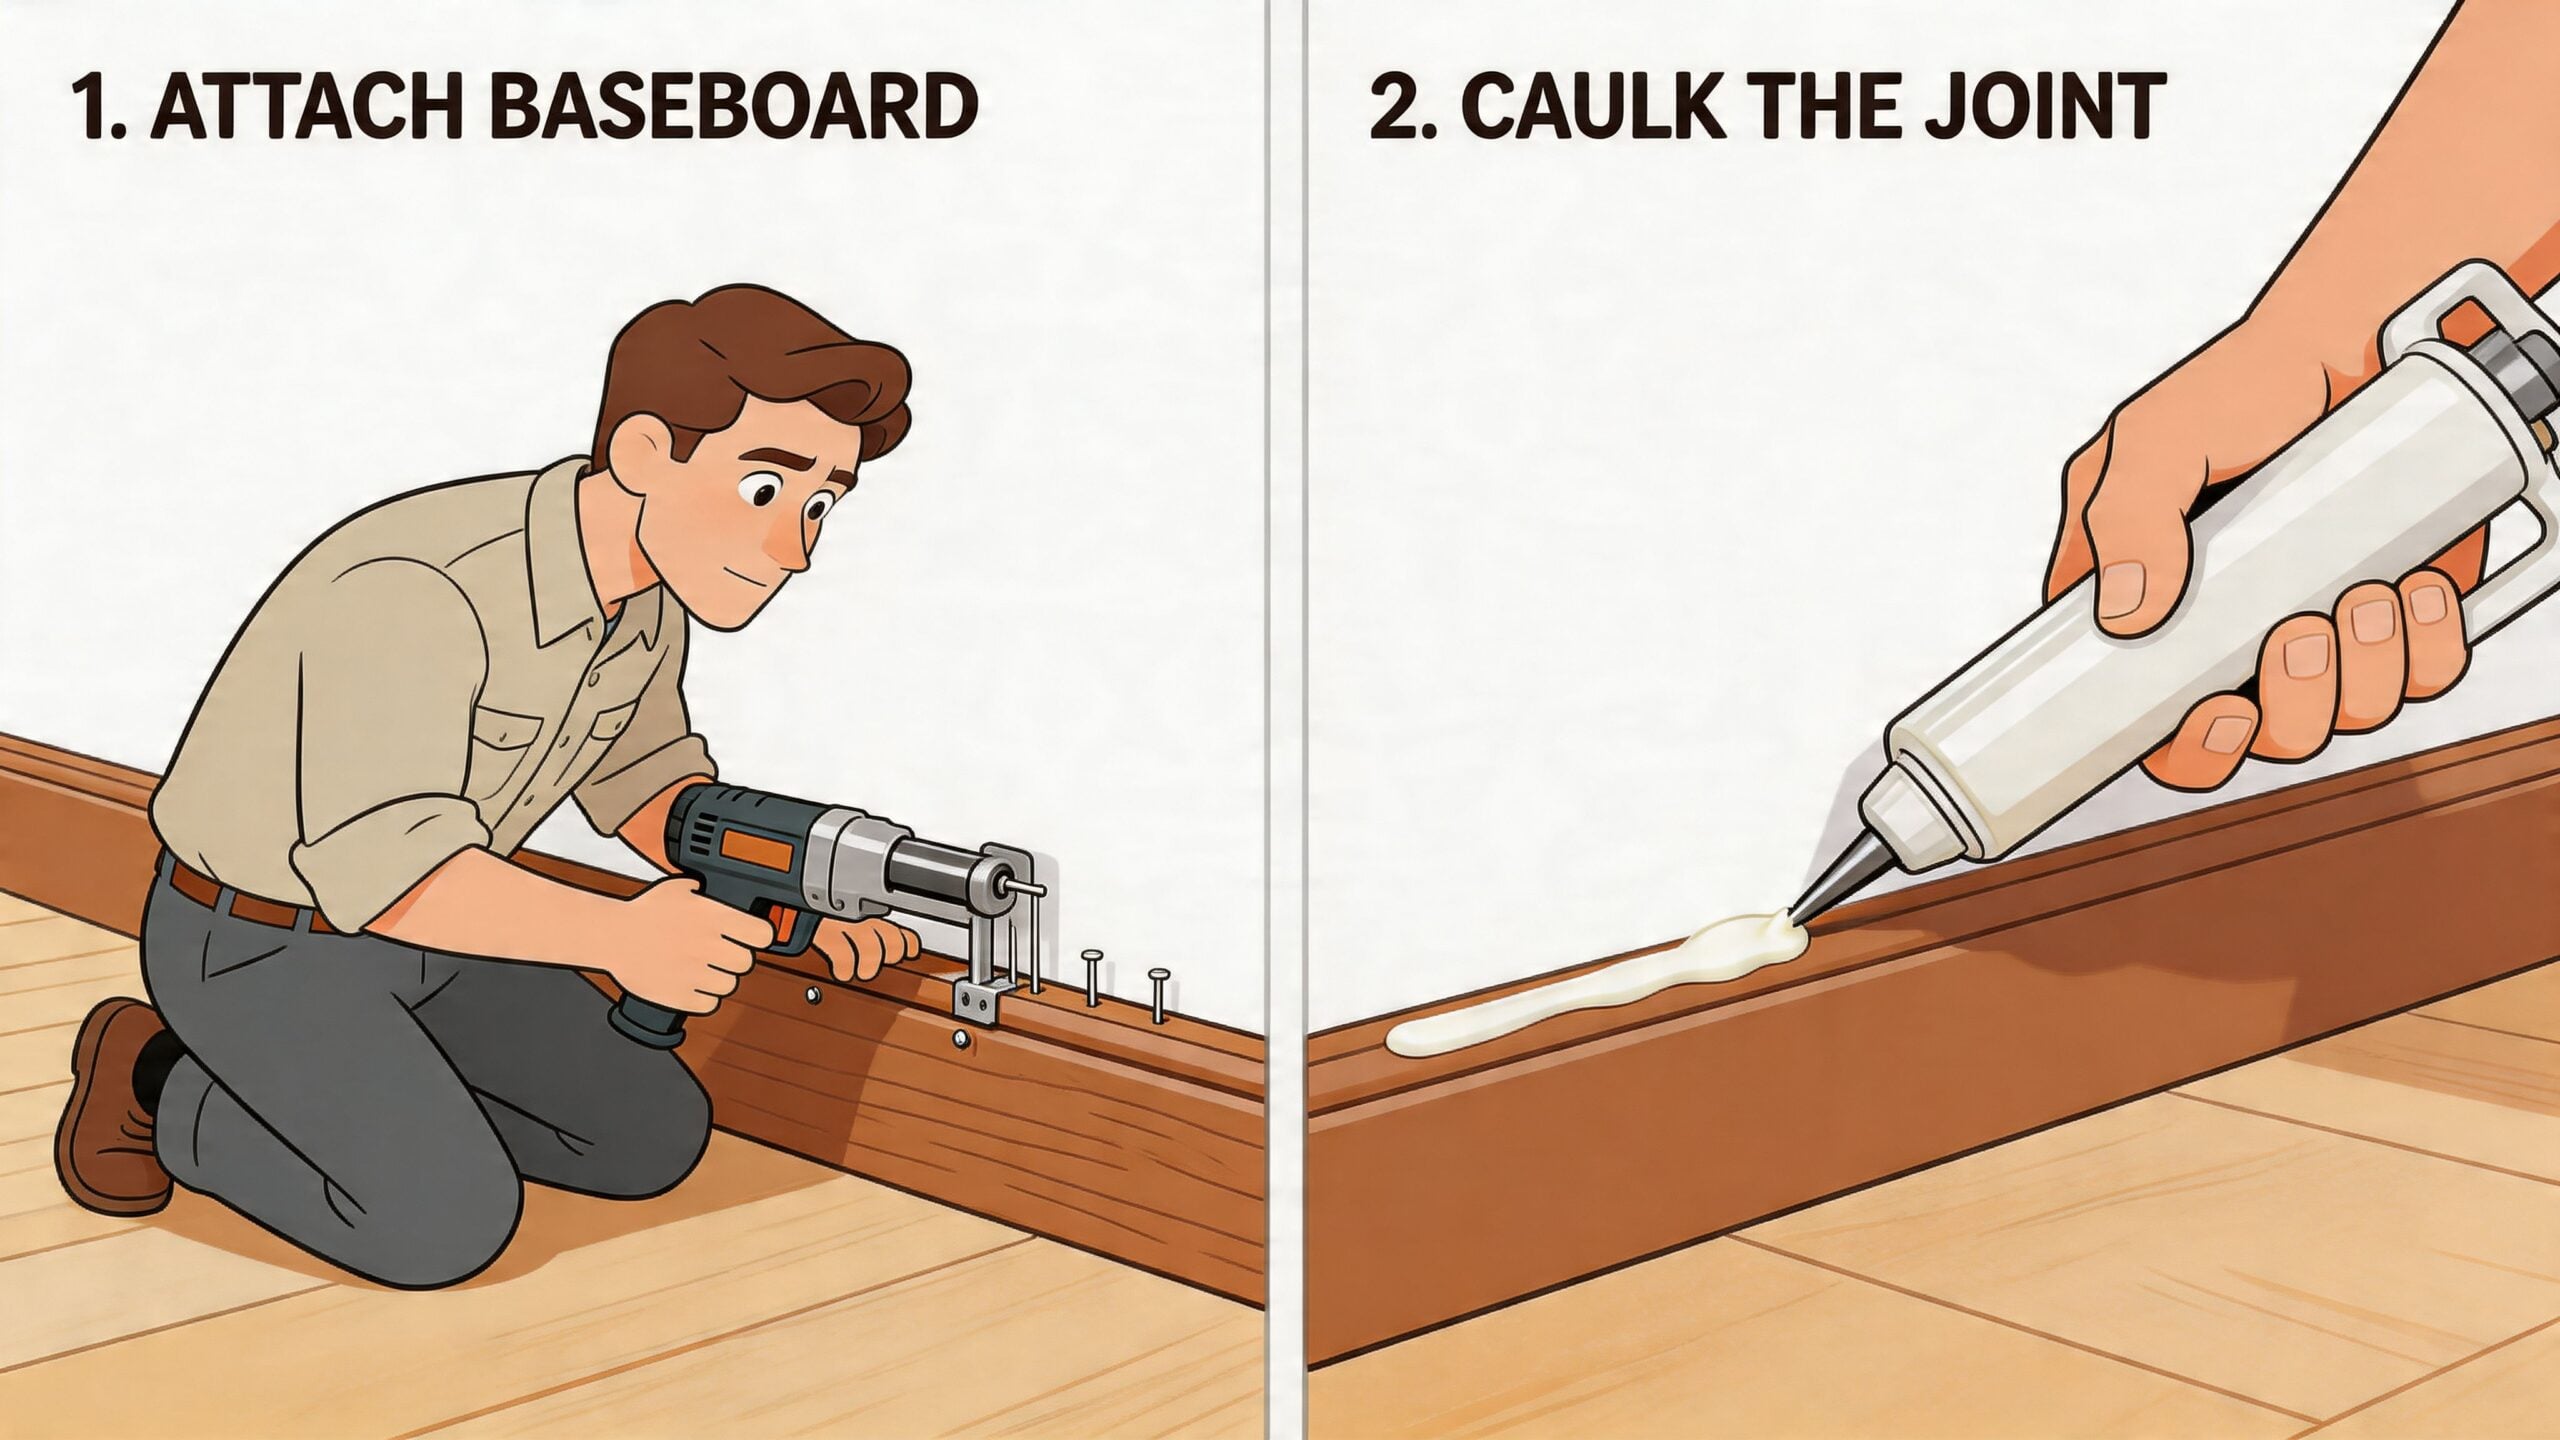
Fastening that keeps the profile tight
Baseboard needs to catch framing, not just drywall. In newer construction, stud layout is usually predictable. In older Upstate homes, especially around Albany and Greene County, plaster thickness can vary enough that the same nail length behaves differently from one wall to the next.
A steady routine helps:
- Hold the top edge to your line first
- Fasten at stud marks before filling in between
- Use upper and lower nail placement when the profile allows it
- Recheck inside and outside corners before the last nails go in
If the wall bows, pull the board in a little at a time from one end. Driving the middle first often leaves a hollow spot or opens a joint you already worked hard to fit.
Scribing the bottom edge in old houses
Older homes often reveal the distinction between clean trim work and average trim work. Floors in Capital Region houses are often out enough that a straight baseboard leaves a visible shadow line at the bottom, even when the top edge looks good.
Scribing solves that by matching the board to the floor instead of asking the floor to look straighter than it is.
- Set the board in place
- Find the biggest gap under it
- Set a compass to that gap
- Run the compass along the floor to mark the cut line
- Trim the bottom edge carefully
- Test-fit and tune it until the board sits naturally
On painted base, a well-scribed bottom edge usually looks better than trying to hide a wandering gap with caulk. I’ve seen that make the difference in plenty of older rooms where the homeowner knew something looked wrong but couldn’t put a finger on it.
Filler and caulk should stay subtle
Overfilling is one of the easiest ways to make good trim look amateur. Nail holes only need enough filler to level the surface. Spread it too wide and the patch flashes through paint, especially on semi-gloss.
Caulk works the same way. Use paintable acrylic caulk where the top of the baseboard meets the wall and on tiny finish gaps. Don’t use it to rebuild a bad joint. If the corner needs that much help, the fit needs more attention first.
Good results usually come from a small bead, one clean pass, and a wipe before the caulk skins over.
Protect the room while you finish it
Trim tools do plenty of damage when they get set down carelessly. Keep a pad, scrap cardboard, or a folded drop cloth under nailers, pry bars, and tool bags. If you’re working over finished wood, it helps to follow the same habits used for protecting hardwood floors from scratches so the trim job doesn’t create a floor repair.
Paint touch-up and the last inspection
Pre-painted boards save time, but they never eliminate touch-up. After the trim is installed, check every joint in side light, fill only what needs filling, and feather the repairs so they disappear under finish paint. The best trim work doesn’t call attention to itself. The lines just look right.
If you hire this part out, ask direct finishing questions before the work starts. This checklist of questions to ask before hiring a contractor is a useful way to screen whether someone plans to fit and finish trim properly, or just get it on the wall fast.
Estimating Time Cost and When to Call a Pro
Some baseboard jobs are satisfying DIY work. Others turn into a chain of coping practice, floor scribing, tool buying, and do-overs. The smart move is to know which one you’re looking at before the first board comes home.
Cost is part of that decision, but so are house conditions, your available time, and how visible the room is.
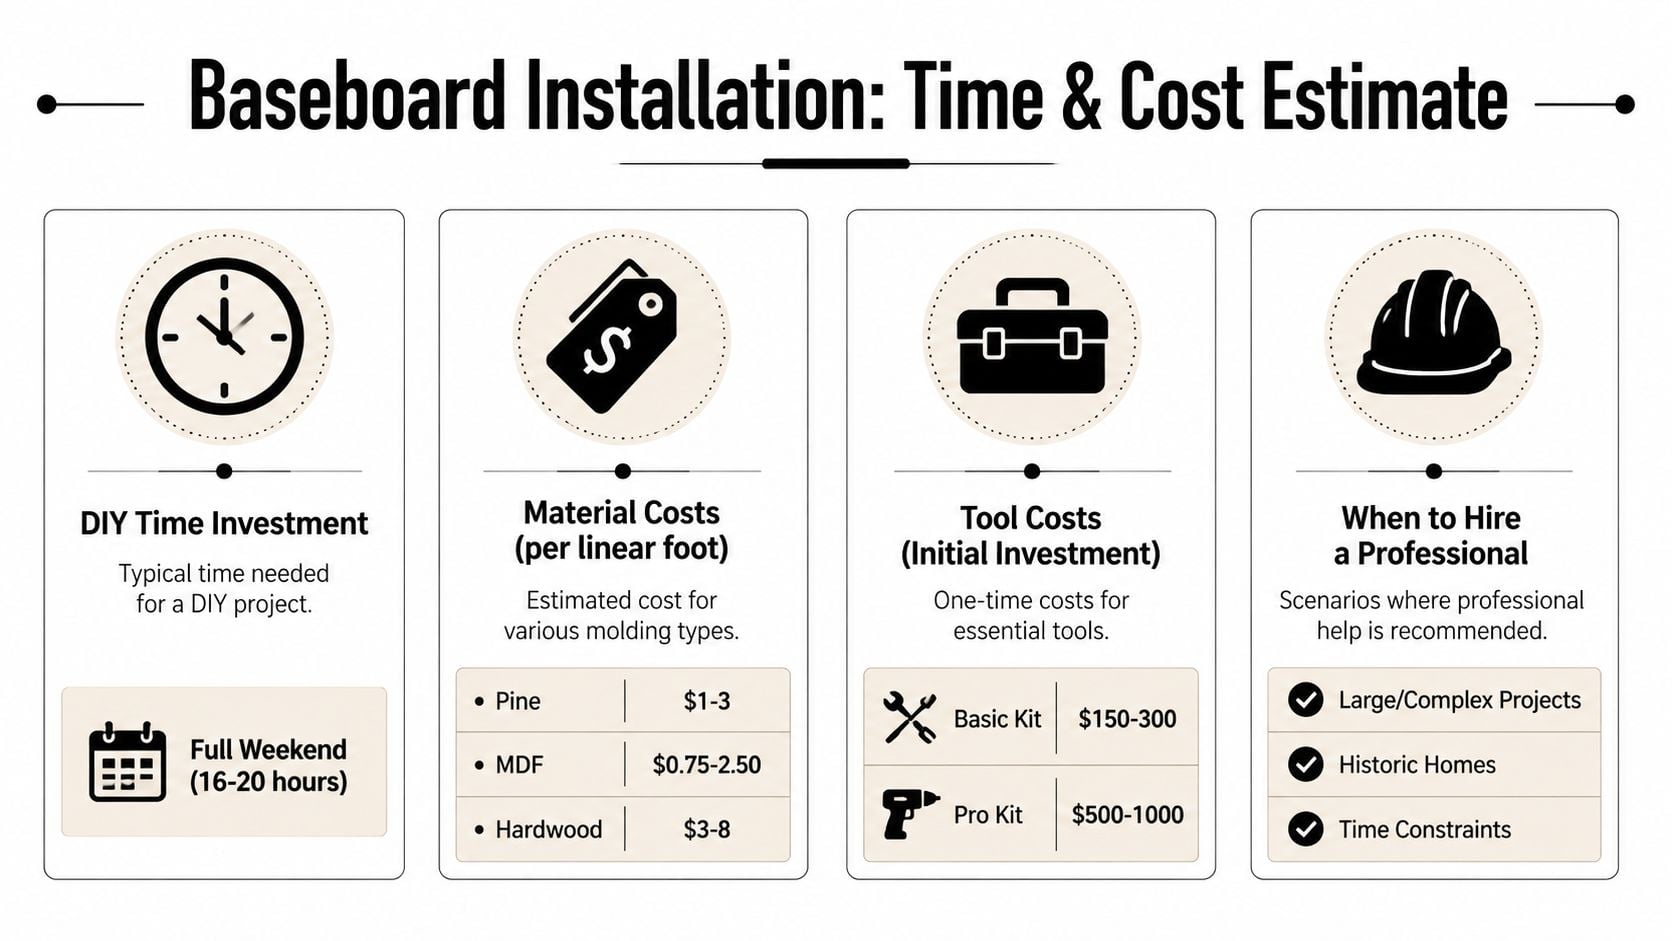
What professional installation costs
For budgeting, the estimated cost for professional baseboard molding installation in January 2026 starts at $8.96 to $13.71 per linear foot, including labor and materials, according to the Homewyse Cost Calculator. The useful part of that tool is the zip-code adjustment, which gives homeowners in Upstate New York a more localized benchmark instead of a broad national guess.
If you’re already budgeting a larger room update, that trim cost is easier to judge alongside flooring. A related local planning point is this guide to hardwood flooring installation cost, since many homeowners tackle both jobs close together.
Time is the hidden cost in DIY
DIY can save money, but only if the room is straightforward and you already own or can borrow the key tools. In older houses, time disappears into detail work. You may spend half a day on corners that would be routine in a newer build.
That’s usually where people underestimate the job:
| Situation | DIY outlook | Why it changes the pace |
|---|---|---|
| Square room with stable walls | Good candidate | Fewer adjustments, repeatable cuts |
| Older room with uneven floors | Slower than expected | Scribing and dry-fitting take time |
| Rooms with many doors and returns | Fussy work | More short cuts and visible transitions |
| Historic home trim matching | Often better for a pro | Existing details need careful adaptation |
A simple test for hiring help
Consider bringing in a professional if any of these are true:
- The house is older and visibly out of square
- You don’t own a miter saw, brad nailer, or coping saw
- The room has long runs, many corners, or difficult transitions
- The baseboard profile is ornate and mistakes will show
- The flooring is already finished and you don’t want risk
- You need the room done cleanly and quickly
If you do hire out, ask practical screening questions before anyone starts cutting. This checklist of questions to ask before hiring a contractor is a useful way to separate a careful installer from someone who plans to caulk over every problem.
If the room is highly visible and the house is old, paying for craftsmanship often feels cheaper than redoing bad trim later.
The best choice isn’t always DIY or always professional. It’s the option that leaves you with tight joints, clean lines, and no regrets.
Putting the Finishing Touch on Your Capital Region Home
Baseboard molding installation looks simple until a real house gets involved. That’s why the basics matter so much. Careful measuring, solid stud layout, coped inside corners, and scribed bottom edges are what make the trim look like it belongs to the house instead of being forced onto it.
In older homes around Albany, Schenectady, Troy, Freehold, and Greene County, that extra care pays off fast. Floors don’t stay flat. Corners don’t stay square. Walls don’t always stay honest. Good trim work respects that and adjusts to it.
The best result usually comes from three habits. Prepare more than you think you need to. Cut for the room you have, not the room you wish you had. Finish lightly enough that the craftsmanship shows and the patchwork doesn’t.
That final line at the bottom of the wall does more than cover a gap. It completes the room. It sharpens the paint, flatters the floor, and gives everything above it a stronger frame. When it’s done right, the whole space feels calmer and more intentional.
If you’re planning a room update in Freehold, Albany, or anywhere in the Capital Region, Tip Top Furniture & Mattresses can help you pull the whole space together. Since 1978, the family-owned showroom has helped local homeowners coordinate flooring, furniture, décor, custom orders, and design details that make a room feel finished. If you want guidance that connects the floor, the furnishings, and the final trim choices, visit the showroom or explore their design services, financing options, custom order support, and clearance finds online.