Expert Roman Shade Installation: Flawless Results

A lot of Albany-area homeowners reach the same point with a room. The furniture is in place, the paint works, and the space still feels unfinished when the windows are bare. Roman shades often solve that problem quickly because they add softness, pattern, and structure without making a room feel heavy.
That said, roman shade installation can feel more technical than it looks. Older homes across the Capital Region often have frames that aren't perfectly square, trim that isn't perfectly level, and windows that seem standard until the tape measure comes out. That's usually where the hesitation starts.
For homeowners who want a polished result, the good news is that modern roman shade installation is much more approachable than it used to be. Installation has evolved from a fully custom fabrication process to a standardized system built around pre-drilled headrails and hardware, which is why it works as a reliable residential method for inside and outside mounts alike, as noted in this Roman shade installation guide. For anyone mapping out the full room before touching the window, a simple room layout planner can also help tie the shades into the furniture, rug, and lighting plan.
Before ordering, some homeowners also like to review the broader cost side of window projects. A practical reference for that early budgeting stage is this article on blinds budgeting for luxury homes, especially when multiple rooms are involved.
Table of Contents
- The Perfect Finish Starts with a Plan
- Preparation and Measurement for a Perfect Fit
- Choosing Your Shade and Mounting Hardware
- The Roman Shade Installation Process Unpacked
- Troubleshooting Common Installation Hiccups
- DIY vs Professional Installation in the Albany Area
The Perfect Finish Starts with a Plan
A roman shade usually looks effortless once it's up. The folds sit neatly, the fabric softens the room, and the window feels finished. What homeowners don't always see is that the clean final look starts long before the first screw goes into the frame.
In many Albany and Greene County homes, planning matters even more than people expect. One window may sit in a deep, square frame, while the next one in the same house may have trim build-up, slight bowing, or an uneven sill. That's especially common in older homes where nothing is quite as uniform as it appears from across the room.
Practical rule: A shade can only look custom if the measurements, hardware choice, and mounting surface all work together.
That's why the strongest installs start with a simple checklist:
- Study the opening: Check whether the frame is deep enough and reasonably square.
- Decide on the visual goal: Some rooms benefit from a tidy inside mount, while others need an outside mount to hide trim issues or block more light.
- Match the shade to the room: A breakfast nook, bedroom, and formal living room don't all need the same fabric weight or operating style.
- Think beyond the window: The shade should relate to the room's furniture lines, wall color, and flooring tone.
For many homeowners, the plan gets clearer once the room is viewed as a whole instead of as a standalone window project. That's often the difference between a shade that merely fits and a shade that feels like it belongs.
A careful plan also lowers stress on installation day. When the mount style, hardware, and measurements are settled ahead of time, the work becomes a sequence of manageable steps instead of a string of last-minute guesses.
Preparation and Measurement for a Perfect Fit
A Roman shade usually succeeds or fails before the first bracket goes up. In our Albany-area showroom, we often meet homeowners who are ready to install, only to find that the underlying issue is not the drill or the screws. It is the opening itself. An older farmhouse in Colonie, a brownstone in Albany, and a ranch in Clifton Park can all ask for slightly different measuring habits because wood trim, plaster, and settled frames rarely behave the same way.
Inside mount or outside mount
Start by choosing the mount style before you record final numbers. That order matters. Measuring for an inside mount and measuring for an outside mount are related jobs, but they are not the same job.
An inside mount sits within the window frame. It gives a custom look, a bit like cabinetry that fits neatly into a wall opening. It works best when the frame is fairly square, the trim is worth showing off, and there is enough flat surface for the brackets to sit securely.
An outside mount installs on the wall, trim, or a mounting board around the window. This option is often the better answer in older Capital Region homes, especially when the frame is shallow, the sides are not perfectly parallel, or you want more light control and visual coverage.
Depth is the first checkpoint for an inside mount. Roman shade brackets need a flat area to grab onto, and decorative trim inside the frame can steal that space quickly. From the front, a window may look deep enough. Once you put a tape measure inside the opening, you may find curved casing, a lip of old paint, or wood that has bowed over time. That is common in homes we see across Albany, Troy, and the surrounding towns.
If the depth is questionable, do not force an inside mount just because you like the look. An outside mount often solves the problem cleanly and can make the window look more balanced.
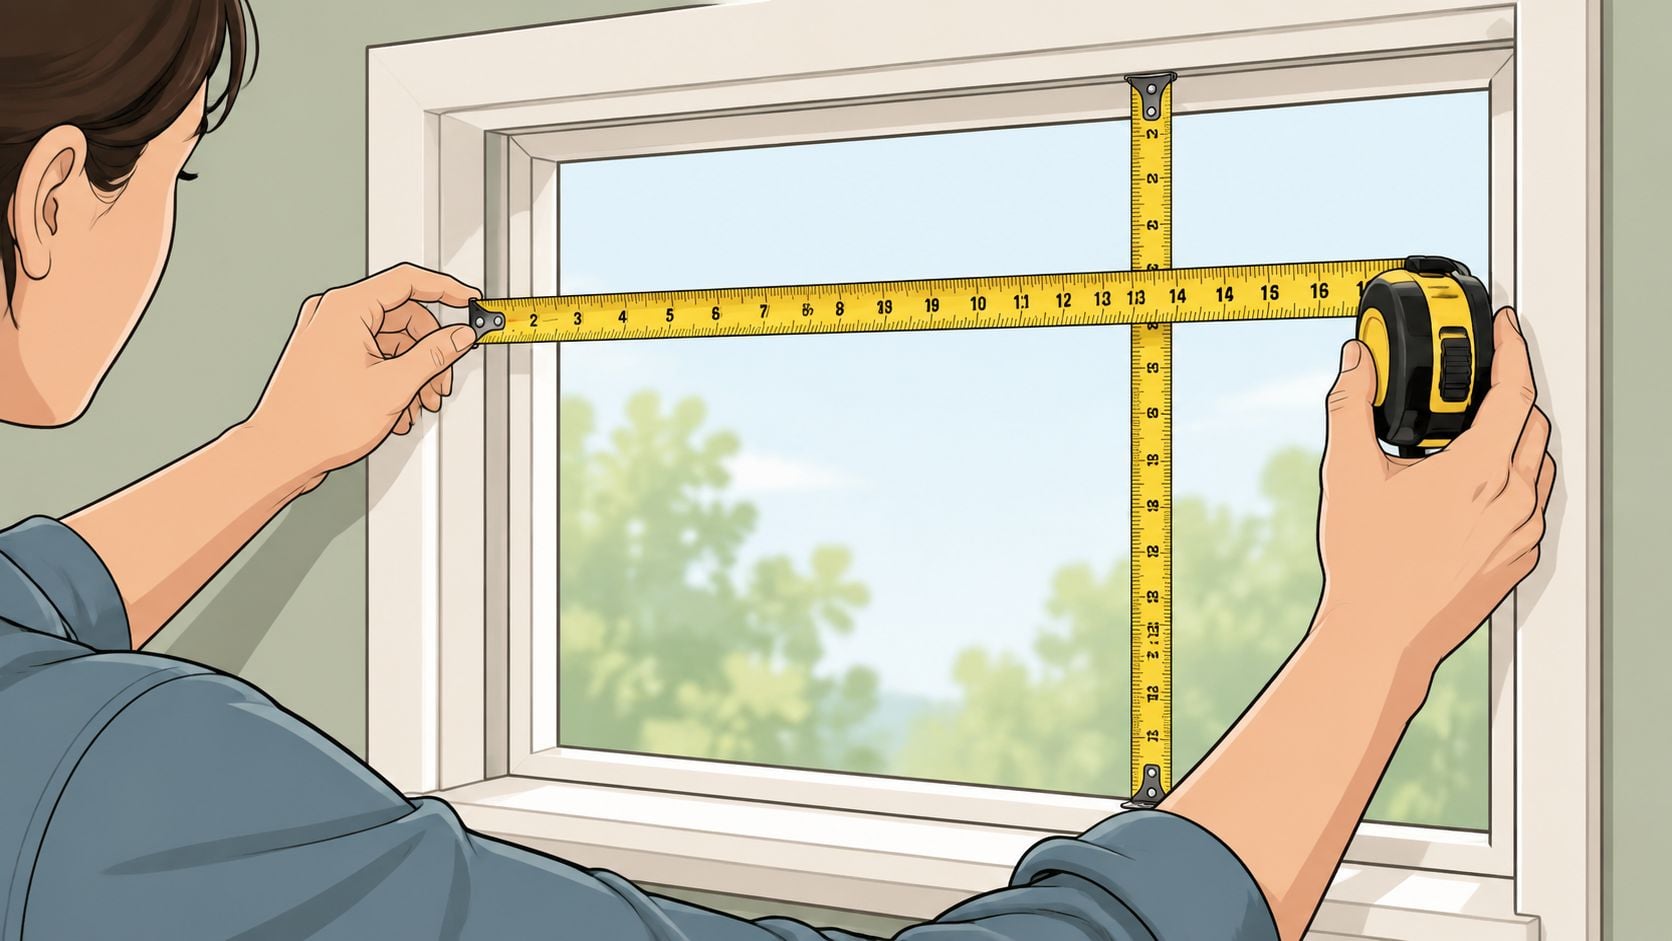
How to measure without costly mistakes
For an inside mount, measure with the caution you would use when fitting a drawer into an older cabinet. One tight spot can affect the whole fit.
Use this method:
- Measure the width at the top, middle, and bottom. Older frames often narrow slightly in one area.
- Measure the height at the left, center, and right. Sills and headers are not always level.
- Record each number right away. Even a small memory error can turn into an ordering error.
- Use the smallest width and the largest height for inside mounts. That helps reduce side rubbing and short coverage.
- Measure depth separately. Width and height do not tell you whether the brackets can sit flat.
For an outside mount, the goal changes. You are no longer fitting within the opening. You are deciding how much visual and light coverage you want around it. Measure the window width and height, then add enough extra space on the sides and above the frame to create the look and coverage you want. In homes with uneven trim, this extra coverage can hide small irregularities that would stand out with an inside mount.
Homeowners comparing several window-related measurements at once sometimes find it helpful to review how to measure window screen size, since the same discipline applies. Measure each opening on its own. Do not assume two windows beside each other are identical.
A simple tool set helps:
- Steel tape measure: More dependable than a fabric tape for hard edges and corners.
- Pencil: Easy to correct if you need to revise a note.
- Notepad or phone notes: Helpful for keeping each window separate by room.
- Level: Useful for checking how true the opening really is.
- Drill and proper fasteners: Important later, especially if you are mounting into plaster, wood trim, or masonry.
- A guide for layered treatments: If you are pairing shades with drapery, this curtain panel sizing guide can help you judge proportions.
One more practical tip from years of in-home measuring. Label the window before you leave the room. “Front bedroom left” is better than “bedroom window.” In older homes, two openings can look alike and still vary enough to require different sizes.
Careful prep saves frustration. A few extra minutes with the tape measure usually cost far less than reordering a shade that was nearly right but not quite right. And if a window opening looks suspiciously uneven, professional measuring can be money well spent.
Choosing Your Shade and Mounting Hardware
A Roman shade that looks beautiful in the store can behave very differently once it is hanging in a real Albany-area home. We see that often in older houses with trim that is slightly out of square, wide front windows that need more support than expected, or rooms where bright morning sun changes how a fabric reads. The shade itself matters, but the hardware behind it matters just as much.
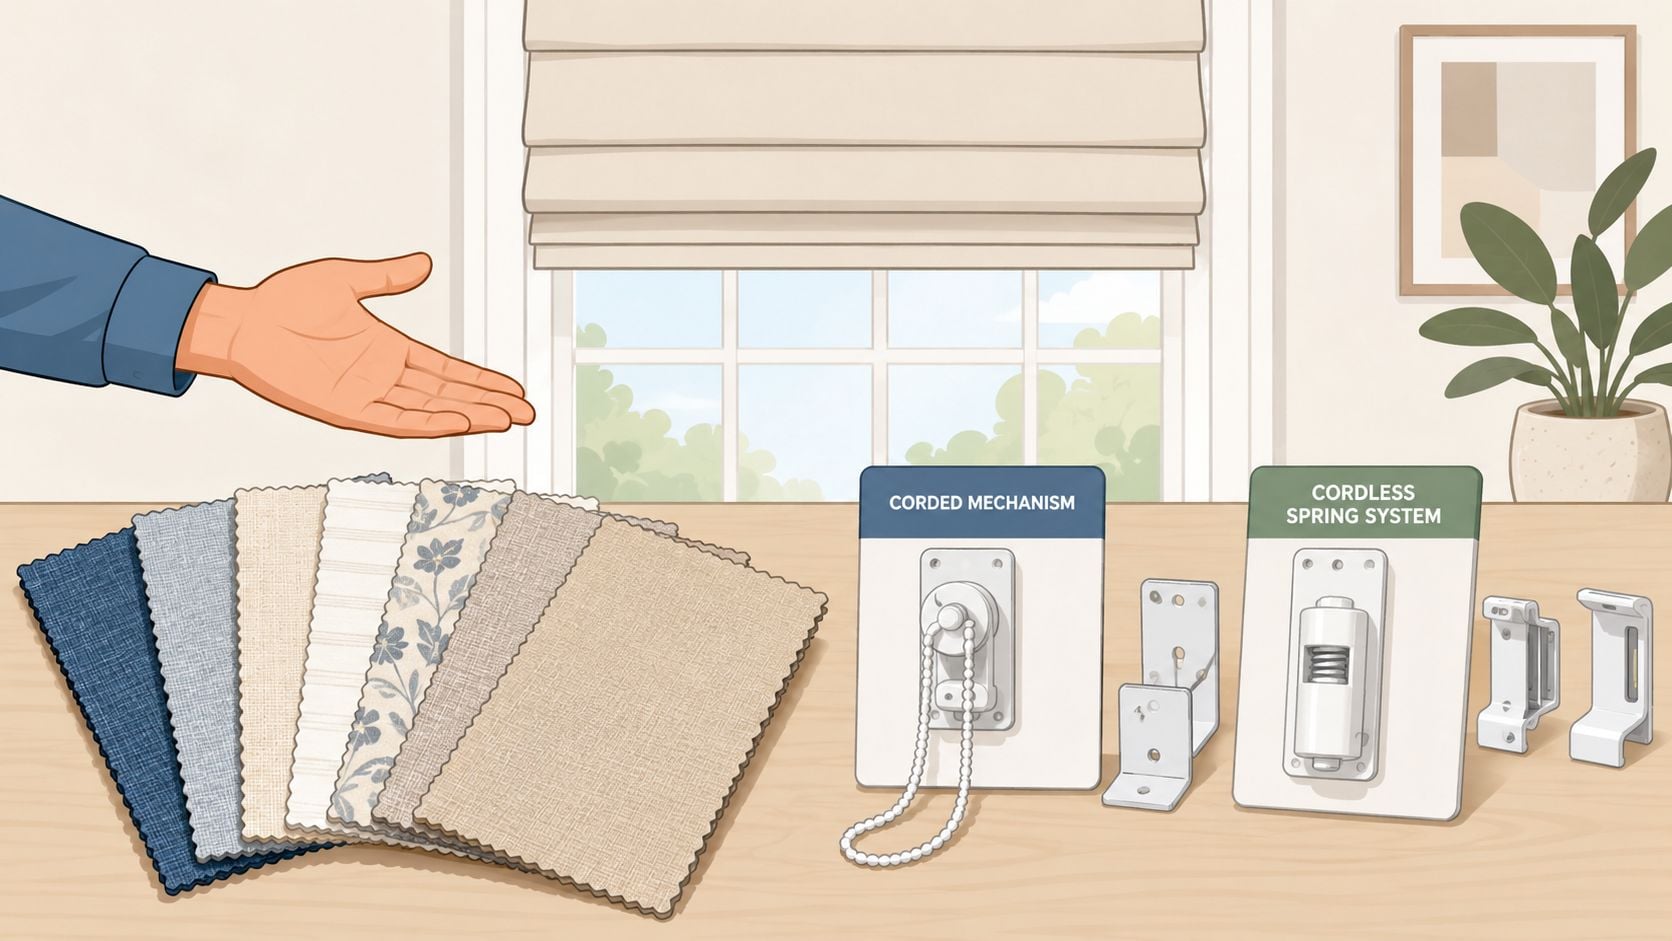
Comparing operating styles
Start by matching the operating style to the way the room functions. A formal dining room, a child's bedroom, and a tall stairwell window may all call for different solutions, even if the shades will look similar from across the room.
Some homeowners still choose corded shades because they feel familiar and direct to operate. They can work well in adult-focused spaces where the window is easy to reach and the household is comfortable with a traditional setup.
Cordless shades are popular for everyday living because they offer a cleaner look and simpler daily use. For families with children or pets, they also reduce visual clutter around the window, which many homeowners appreciate in bedrooms and family rooms.
Motorized shades make sense for tall windows, grouped openings, or rooms where opening and closing several shades every day would get tedious fast. In practical terms, they are often a comfort choice as much as a style choice.
A quick comparison helps:
| Style | Good fit for | Main consideration |
|---|---|---|
| Corded | Traditional setups and straightforward access | Needs thoughtful safety planning |
| Cordless | Family rooms, bedrooms, everyday convenience | Mechanism quality matters |
| Motorized | Large windows and convenience-focused spaces | Better for more complex projects |
If you are weighing privacy, light control, and fabric appearance at the same time, this guide on how to choose window treatments can help narrow the options before you place an order.
Why hardware choice matters on wide windows
Hardware works like the frame behind a sofa. You may not focus on it first, but it supports everything you see and use. A shade can have the perfect fabric and still disappoint if the brackets are undersized, poorly spaced, or too few for the width.
Wide windows are the most common trouble spot. In many homes around Albany, Troy, and Schenectady, larger front-facing windows and paired openings need more than a basic two-bracket setup. Extra support, often including a center bracket or additional evenly spaced brackets, helps keep the headrail from bowing and helps the shade raise and lower more evenly over time.
Here is a practical perspective:
- Single narrow window: Standard hardware is often enough.
- Wide picture-style opening: Extra support may be needed to keep the headrail stable.
- Several shades in one line: Consistent bracket placement affects how balanced the whole wall looks.
Older Capital Region homes add another layer. Plaster walls, deep wood trim, and openings that have settled a bit over the years can change what hardware makes sense and where it should go. After more than 45 years of helping local homeowners, we can tell you that many installation frustrations begin with a shade choice that was fine on paper but not ideal for the house itself.
In that situation, one showroom visit can save a lot of trial and error. Tip Top Furniture & Mattresses offers window treatment options along with custom ordering, which helps when fabric, operating style, bracket support, and room coordination all need to work together. If a window seems unusual or the hardware requirements are unclear, getting professional guidance before ordering is often the easier path.
The Roman Shade Installation Process Unpacked
Saturday morning is when many Albany-area homeowners decide to hang the shade. The box is open, the drill is charged, and the window looks simple enough. Then the trim is a little uneven, the plaster feels brittle, or the brackets do not sit quite where you expected. After more than 45 years helping Capital Region homeowners with window treatments, we can tell you this is the point where a careful process saves the day.
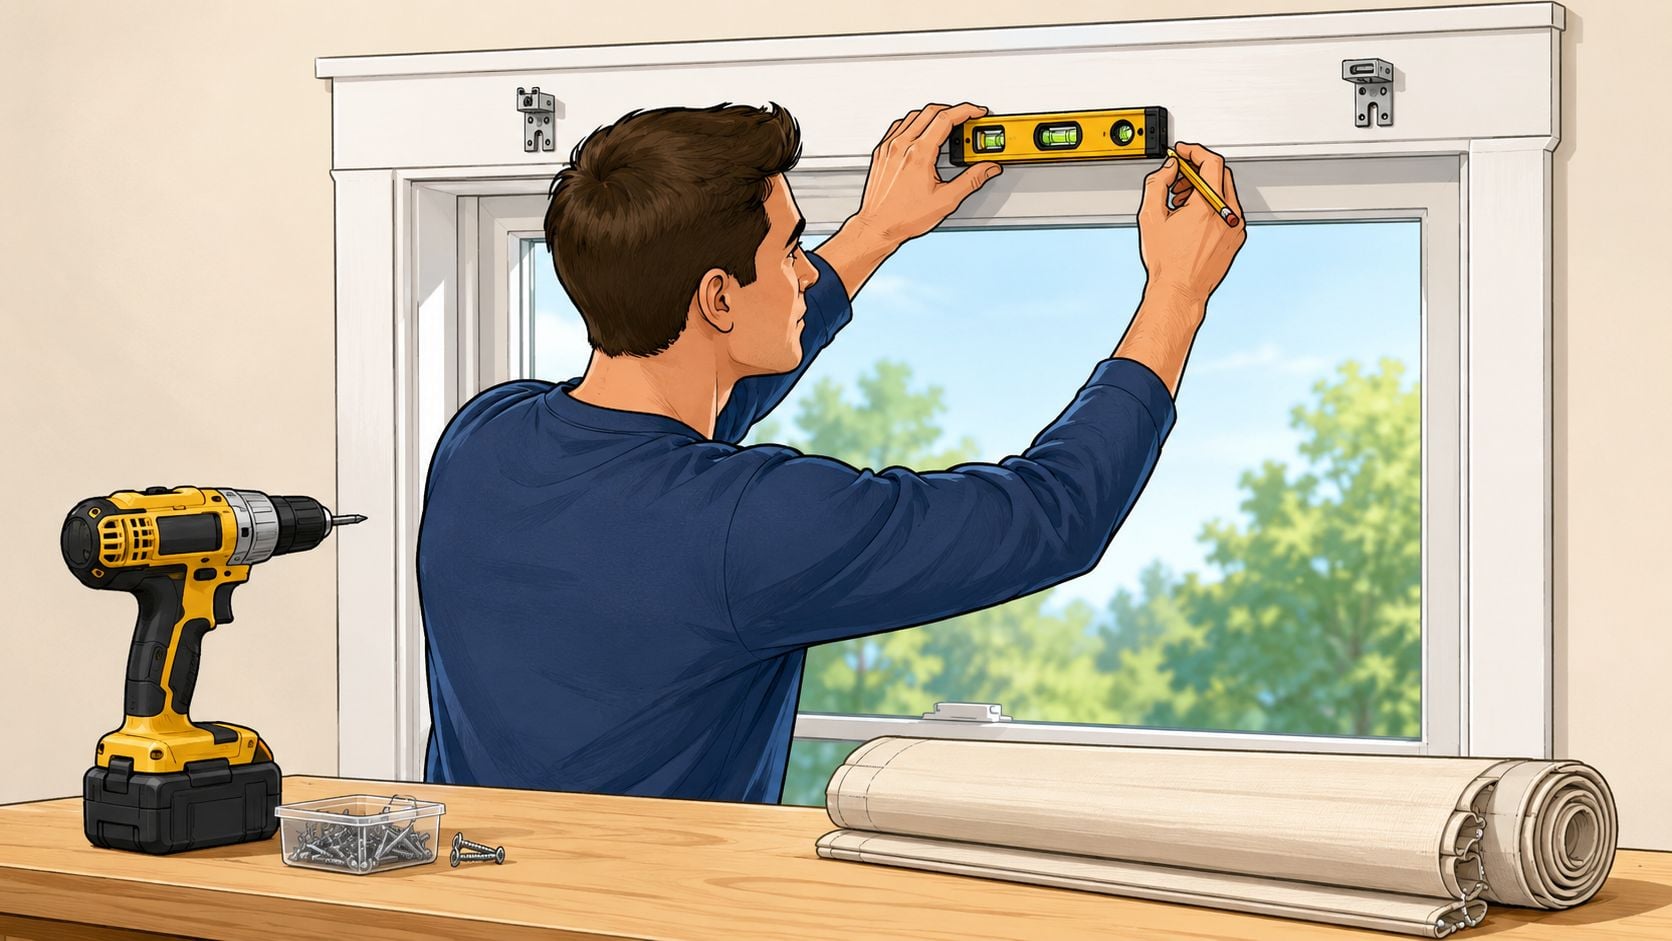
Mark and level before drilling
Start with a dry fit. Hold the headrail in place, or use the paper template if your shade includes one, and study how everything lines up before you make a single hole. This step matters even more in older homes around Albany, Troy, and Schenectady, where trim can be beautifully crafted but not perfectly square.
Bracket placement should stay a few inches in from each end of the headrail, with extra support spaced evenly across wider shades. The goal is simple. You want the weight carried evenly so the shade lifts straight and the headrail stays stable over time.
A steady marking routine helps:
- Mark lightly first: Pencil marks are easy to adjust.
- Use a level across bracket points: Wood trim can fool your eye.
- Check for mechanism clearance: The shade needs room to operate without rubbing.
- Predrill when the surface calls for it: Pilot holes help keep screws from drifting off your mark.
The same careful layout habits used in this step-by-step guide to hanging pictures with precision apply here too. A shade works like a visual focal point, so even a small measuring error can stand out once the fabric is hanging.
A roman shade can look centered at first glance and still lift unevenly if the brackets are slightly out of line.
Install brackets and secure the headrail
Once the marks look right, attach the brackets with hardware that matches the surface. Wood trim, drywall, and plaster do not behave the same way. In many older Capital Region homes, that is where DIY installations get tricky. A screw that bites firmly into solid wood may need an anchor in drywall, and old plaster can crack if you rush the drilling.
Tighten the brackets enough to hold them securely, but leave yourself a little adjustment room until you confirm alignment. That small pause can save you from removing and remounting hardware a few minutes later.
Then place the headrail into the brackets based on the system your shade uses. Some snap into place. Others slide in and lock with a tab or screw. If the fit feels forced, stop and check alignment before pressing ahead. Roman shades are more like cabinet doors than wall art. If the hardware starts out slightly off, daily use will make that problem more obvious.
A simple install order keeps things under control:
- Attach the brackets at the marked points
- Check level again before final tightening
- Set the headrail in place evenly
- Secure all hardware after the shade looks square
Wide shades deserve one extra look. If a center support is part of the setup, make sure it is properly carrying weight and not sitting just a touch too high or low.
Finish with a careful test run
Now test the shade slowly. Raise it, lower it, and stop halfway to watch the bottom rail and fabric folds. This is the moment where good installation shows itself.
A proper test is less about speed and more about pattern. The folds should stack neatly, the rail should travel evenly, and the fabric should clear the sides without scraping. If something looks off, adjust it now while the tools are still out.
Use this final check:
- Confirm smooth movement: No catching or hesitation.
- Check fold stacking: The pleats should settle neatly.
- Install any safety hardware: Cord cleats and similar parts should not be skipped.
- Attach decorative pieces last: Valances or covers go on after operation is confirmed.
- Step back and view the full window: The shade should look aligned with the trim and the room, not just the bracket line.
That last room view matters more than many homeowners expect. In older homes especially, perfect level and visual balance are not always the same thing, and an experienced installer knows how to judge both.
Roman shade installation is straightforward when each step builds on the one before it. If your window has deep molding, settled framing, or old plaster that makes you hesitate, professional help is always an option. Sometimes one well-done install is easier than spending a whole weekend correcting a small error.
Troubleshooting Common Installation Hiccups
You mount the shade, step back, and something feels off. It is a common moment, especially in Albany-area homes where older trim, settled plaster, and slightly uneven window openings can make a correct installation look questionable at first glance.
After helping Capital Region homeowners with window treatments for more than 45 years, we have found that the shade itself is rarely the problem. The issue is usually small and mechanical. A bracket sits a little out of square, the headrail shifts under weight, or the fabric brushes the side of an older frame that is not as straight as it looks.
When the shade looks crooked
Start with a simple reset. Lower the shade all the way, then raise it again slowly. Roman shades work a bit like a properly buttoned shirt. If one part starts slightly off, the whole line can look uneven, but a careful restart often straightens things out.
Then look at the bottom rail halfway up the window. If one side hangs lower, check whether both brackets are mounted at the same height and sitting flat against the surface. In older homes, trim can be proud in one spot and hollow in another, so a bracket may seem secure while still pulling the headrail out of alignment.
A calm reset and bracket check solve many of these cases.
When the shade binds or resists movement
Resistance usually points to pressure somewhere along the path of travel. The shade may be rubbing the frame, the brackets may be pinching the headrail, or a center support on a wider window may be slightly misplaced.
Work through it in this order:
- Check bracket position: Both ends should be level and square to the window.
- Look for side rubbing: Fabric and folds need a little breathing room, especially on inside mounts.
- Inspect the center support: On wider shades, even a small shift can affect how the shade lifts.
- Test with slow movement: A gentle raise and lower makes the sticking point easier to spot.
If the window area still feels unfinished, it also helps to clean the glass and trim so you can see clearances more easily. This guide to maintaining crystal-clear home windows is a useful companion before making final adjustments.
When the hardware feels secure but the shade still acts up
Older Albany homes can fool you. A window frame may be level enough for the eye, but not level enough for a shade mechanism. We see this often in homes with settled casings or layers of old paint and patching around the trim.
If everything appears straight but operation is still uneven, remove the shade and recheck the bracket spacing against the manufacturer template or your own marks. A difference of even a little can change how the headrail carries weight. Homeowners who prefer help with measuring, setup, and in-home finishing often appreciate support from a store that offers delivery and assembly services for home projects.
Do not keep pulling on a shade that is clearly binding. Stop, inspect, and correct the alignment first. That short pause usually saves far more time than trying to force the mechanism into place.
DIY vs Professional Installation in the Albany Area
For a straightforward window, DIY can be a satisfying project. A homeowner with solid measurements, a level, and a free afternoon can often handle it well. That's especially true for a single standard opening in a newer or more consistent frame.
When DIY makes sense
DIY usually fits projects like these:
- One or two accessible windows: Easy reach and simple hardware help.
- Standard openings: Less chance of hidden framing surprises.
- Basic manual shades: Fewer moving parts to coordinate.
Some homeowners also like to clean and prep the glass before mounting so the whole window feels finished at once. A practical companion resource is this guide to maintaining crystal-clear home windows, especially before installing fresh fabric treatments.
When professional help is the smarter call
Some installs are more demanding. Older Albany-area homes can have uneven casings, wide openings, or multiple windows that all need to line up visually across one wall. That's where experience saves time.

Professional help is often the better route when:
- Windows are high, wide, or unusual: These projects need more careful support and alignment.
- Several shades must match across a room: Small level differences become very noticeable.
- Motorized systems are involved: Setup can be more exacting than a manual install.
- The window project is part of a full room update: Coordination with furniture and flooring matters.
For homeowners who want delivery and setup support as part of a broader home project, this page on furniture stores that deliver and assemble may be useful when planning the full space.
For homeowners across Freehold, Albany, Schenectady, Troy, and the surrounding Capital Region who want help choosing, measuring, or coordinating roman shades with furniture, flooring, and décor, Tip Top Furniture & Mattresses offers a practical next step. A showroom visit can help clarify whether the project is a simple DIY, a custom order, or part of a larger room plan, and flexible financing can make the timing easier for bigger home updates.