Ceramic Tile on Stairs: A Complete 2026 Installation Guide

A lot of Capital Region homeowners reach the same point with their stairs. The carpet is worn, the wood is scuffed, the basement entry always seems to track in moisture, and the staircase has become one of the most visibly tired parts of the house. In older Upstate New York homes, that decision gets harder because the stairs often have years of movement, patching, and uneven repairs hidden under the surface.
Ceramic tile on stairs can look sharp and last a long time, but it isn't a forgiving finish. Stairs take concentrated foot traffic, edge impact, wet shoes, pet nails, and constant visual scrutiny. That's why this choice needs more than a style discussion. It needs a realistic look at safety, substrate condition, and the long-term behavior of the stair assembly.
Ceramic tile also carries a long material history. The National Park Service notes that ceramic floor tile use dates back to the fourth millennium B.C., which helps explain why tile still appeals in high-traffic, high-visibility spaces where hardness and fire resistance matter in practice and not just on paper (National Park Service ceramic tile preservation brief). For homeowners comparing options, it can also help to review other alternatives to hardwood floors before committing to a brittle finish on a staircase.
Table of Contents
- An Introduction to Tiling Stairs in Your Capital Region Home
- Planning Your Stair Project Is Tile Right for You
- Choosing the Right Tile and Nosing for Your Stairs
- Preparing the Stair Substrate for a Lasting Installation
- A Step-by-Step Guide to Tiling Treads and Risers
- Grouting Sealing and Finishing for Safety
- Care Costs and When to Call a Professional
An Introduction to Tiling Stairs in Your Capital Region Home
Stairs aren't like a kitchen floor or a foyer. A small flaw on a staircase gets repeated on every tread, every day, in full view. If one edge chips or one tile sounds hollow, the whole installation starts to feel wrong.
That's why ceramic tile on stairs has to be judged on two levels. First, does it fit the look of the house. Second, can the staircase itself support a rigid finish without creating future problems.
Older Upstate homes change the answer
Homes around Albany, Schenectady, Troy, and the surrounding towns often have older framing, patched landings, basement humidity, and seasonal movement that newer how-to guides barely mention. A staircase that looks solid from above may still flex at the nosing, shift at the stringers, or carry uneven repairs under old coverings.
Practical rule: A stair tile job usually succeeds or fails before the first tile is installed.
That matters most in split-level homes, basement stairs, mudroom entries, and back staircases where snow, slush, and grit show up fast. A material that performs well on a stable slab may behave very differently over wood framing that moves with the seasons.
Design matters, but coordination matters too
Tile stairs can work beautifully when they connect cleanly with nearby flooring. Matching the tread tile to adjacent hall flooring, choosing a nosing that doesn't look like an afterthought, and deciding whether the risers should blend in or stand out all shape the final result.
For homeowners trying to coordinate flooring with furniture, wall color, and the rest of the room, one-stop planning usually prevents expensive mismatches. That's especially true when the staircase sits right off a living room, entry, or finished basement where every finish is visible at once.
Planning Your Stair Project Is Tile Right for You
A lot of stair projects around Albany start the same way. The old carpet is stained, the basement steps smell a little musty in July, and tile looks like the clean, durable answer. Sometimes it is. Sometimes it creates a harder, slicker staircase that never feels quite right in winter.

The decision has less to do with whether tile can be installed on stairs and more to do with how those stairs are used, what sits below them, and how much seasonal moisture the house deals with. In older Capital Region homes, those details matter more than the sample board.
Tile earns its keep in the right setting. It cleans up fast, it does not hold grit and slush like carpet, and it can tie a stairway into a tiled entry, mudroom, or lower level. Homeowners sorting through materials often benefit from reviewing different flooring types and their pros and cons before committing to the hardest surface in the house.
Situations Where Tile Usually Makes Sense
Tile is often a practical choice for:
- Basement and mudroom stairs: These areas see damp shoes, salt residue, and tracked-in dirt that can wear out soft coverings quickly.
- Secondary stairs with messy traffic: Back staircases used by kids, pets, or work boots often benefit from a surface that sweeps clean.
- Remodels with adjacent tile floors: Carrying the same finish onto the stairs can make the space feel more intentional, especially in split-level and raised ranch layouts common in this area.
There is a trade-off, though. A material that is easy to clean is not always easy to live with on a staircase every day.
Where Homeowners Should Slow Down
Stairs magnify every weakness in a flooring choice. A floor in an entry can be a little slick and still be manageable. A stair tread cannot.
That is why slip resistance has to be judged in real household conditions, not under bright showroom lights. Dust, fine grit, wet soles, and sock traffic all change the feel of tile. Albany winters make that more serious. Snow gets carried inside, salt crystals scratch surfaces, and melting slush can sit on the first few treads longer than homeowners expect. Sunny Day Pro's tile advice is a useful outside reference for thinking through slip-resistant surfaces before you choose a finish.
Some households should be more cautious than others:
- Families with small children: Kids run stairs, skip steps, and wear socks.
- Homes with older adults: A hard surface leaves little room for recovery after a slip.
- Pet owners: Many dogs hesitate on smooth stair finishes, especially going down.
- Main staircases with constant traffic: Small traction problems become daily aggravations fast.
In our experience, the biggest mistakes happen when homeowners focus on cleaning and overlook feel underfoot. Tile can perform very well on stairs, but only if the surface texture, edge treatment, and expected traffic all line up.
Noise and comfort matter too. Tile is louder than carpet, colder in winter, and less forgiving on knees, dropped items, and bare feet. In an older home where the stairwell already echoes, that difference is noticeable.
A final point for Upstate homes. If the staircase is over a basement or near an exterior entry, moisture and movement should be part of the decision from the start. Tile is a rigid finish. Older wood stairs with minor flex, patched treads, or years of seasonal shifting may still accept tile, but only after careful prep and sometimes after homeowners reconsider whether a softer finish is the smarter long-term choice.
Choosing the Right Tile and Nosing for Your Stairs
A stair tile that looks sharp in the showroom can become a problem fast in an older Capital Region home. On a January afternoon, boots come in wet, snow melts at the entry, and every trip down the stairs tests the surface, the edge, and the grip underfoot.
Tile Body Finish and Real Stair Use
Good stair tile starts with footing, edge strength, and how the surface will age under daily traffic. In Albany area homes, that often means grit from winter sidewalks, damp shoes, and older staircases that already show years of use. A tile that is too polished or too slick asks more from the homeowner than it gives back.
These are the points that deserve attention first:
| Priority | What to look for | Why it matters on stairs |
|---|---|---|
| Surface feel | Textured or grip-conscious finish | Better footing in dry conditions and during wet winter use |
| Edge durability | A tile body suited to repeated impact | Stair fronts take concentrated wear and are prone to chips |
| Visual consistency | Coordinated field tile and trim | Keeps the staircase looking intentional rather than pieced together |
| Maintenance | A finish that hides dust and tracked debris reasonably well | Stairways show dirt faster than many flat floors |
For homeowners weighing surface texture, Sunny Day Pro's tile advice is a helpful outside reference. For the wear side of the decision, our guide to the best flooring choices for high-traffic areas adds useful context because stairs concentrate wear into a narrow path.
Porcelain is often the safer pick over softer ceramic on busy stairs because it usually handles edge abuse better. The trade-off is that harder tile can also feel colder and less forgiving, which people notice in older homes with drafty stairwells or basement access nearby.
Why the Nosing Deserves Extra Attention
The nosing does the hardest work on the staircase. It takes the heel strike, frames the look of each tread, and often shows the first signs of trouble if the wrong trim or tile is used.
Homeowners usually choose among a few common approaches:
- Bullnose profiles: Familiar and comfortable underfoot. They can work well when a matching trim piece is made for the tile, not improvised.
- Square profiles: Cleaner looking, but less forgiving. They need tighter layout, strong support, and careful alignment to avoid a sharp, vulnerable edge.
- Trim-assisted edges: Often the practical answer when no matching bullnose exists or when added edge protection makes more sense than forcing a decorative match.
Availability is better than it used to be. As noted earlier, the ceramic tile market is large enough that trim pieces, specialty profiles, and stair components are easier to find than they were years ago. That helps with design, but it does not solve the main jobsite questions.
In older Upstate homes, I pay close attention to how the nosing will hold up if the stair has even a little seasonal movement. A sleek edge profile may look right on day one and still be the wrong choice if it chips easily, feels slippery in socks, or leaves the tread front exposed during a wet winter. The best selection is the one that stays safe, looks clean, and tolerates years of hard use without asking for constant repairs.
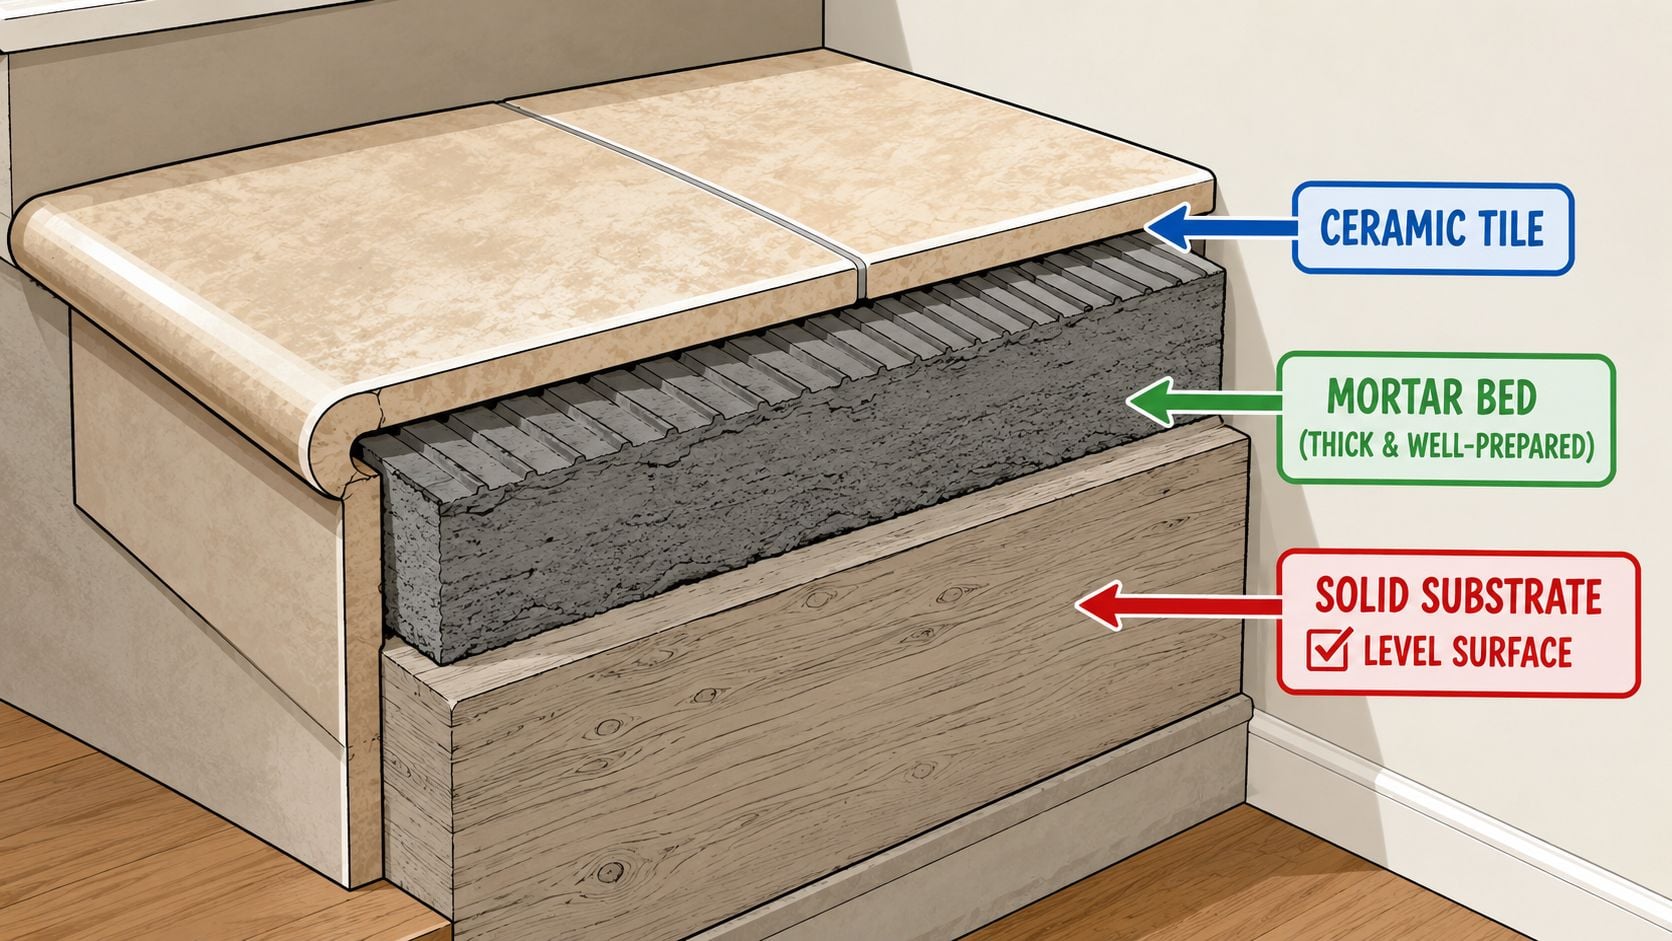
Preparing the Stair Substrate for a Lasting Installation
The durability of an installation becomes evident. A rigid finish over a moving or uneven staircase won't stay attractive for long.
Wood Stairs Need an Assembly Not Just Adhesive
Wood stairs are the most common trouble spot in older homes because wood moves. It expands, contracts, and flexes in ways tile doesn't tolerate well. That's why a professional stair installation over wood uses a system, not just mortar and tile.
LATICRETE's stair detail for wood stairs calls for a cleavage membrane such as 15 lb builders felt or 4 mil polyethylene, followed by mechanically fastened 3.4 lb galvanized diamond metal lath before building the mortar bed. The same detail specifies embedding tile into wet, sticky thin-set with a beating block or rubber mallet, and says tiles larger than 8" x 8" should be back-buttered for full bedding (LATICRETE wood stair tile detail).
That may sound involved, but that's the point. Ceramic tile on stairs over wood needs separation from wood movement if it's going to hold up.
A sound prep sequence usually includes:
- Removing weak layers: Old adhesive residue, loose coverings, and patch material that won't bond well have to go.
- Checking for movement: Squeaks, bounce, and deflection at the tread front need correction before tile work begins.
- Flattening the plane: A staircase can be level enough to walk on and still be too uneven for tile.
- Building the proper assembly: Membrane, lath, mortar bed, and proper setting technique work together.
Field note: If someone proposes bonding tile directly to aging wood stairs with little more than adhesive, that's a warning sign.
Common Failure Points in Older Capital Region Homes
In Upstate New York, older homes often bring a combination of seasonal humidity shifts, basement dampness, patched stair framing, and previous remodel layers. Those conditions don't always show up until the old carpet or vinyl is removed.
Typical red flags include:
- Loose tread fronts
- Uneven riser heights caused by past overlays
- Nosing repairs that flex under pressure
- Substrate patches that crumble or powder
- Moisture migration from lower levels
For homeowners sorting through renovation choices, this is the stage where broader guidance on how to choose flooring becomes practical. The right floor isn't just the one that looks right. It's the one the structure can support.
Concrete stairs are simpler in one sense because they don't move like wood, but they still need to be clean, stable, and properly prepared. Paint, residue, dust, or weak patches can undermine bond just as effectively as movement does on wood.
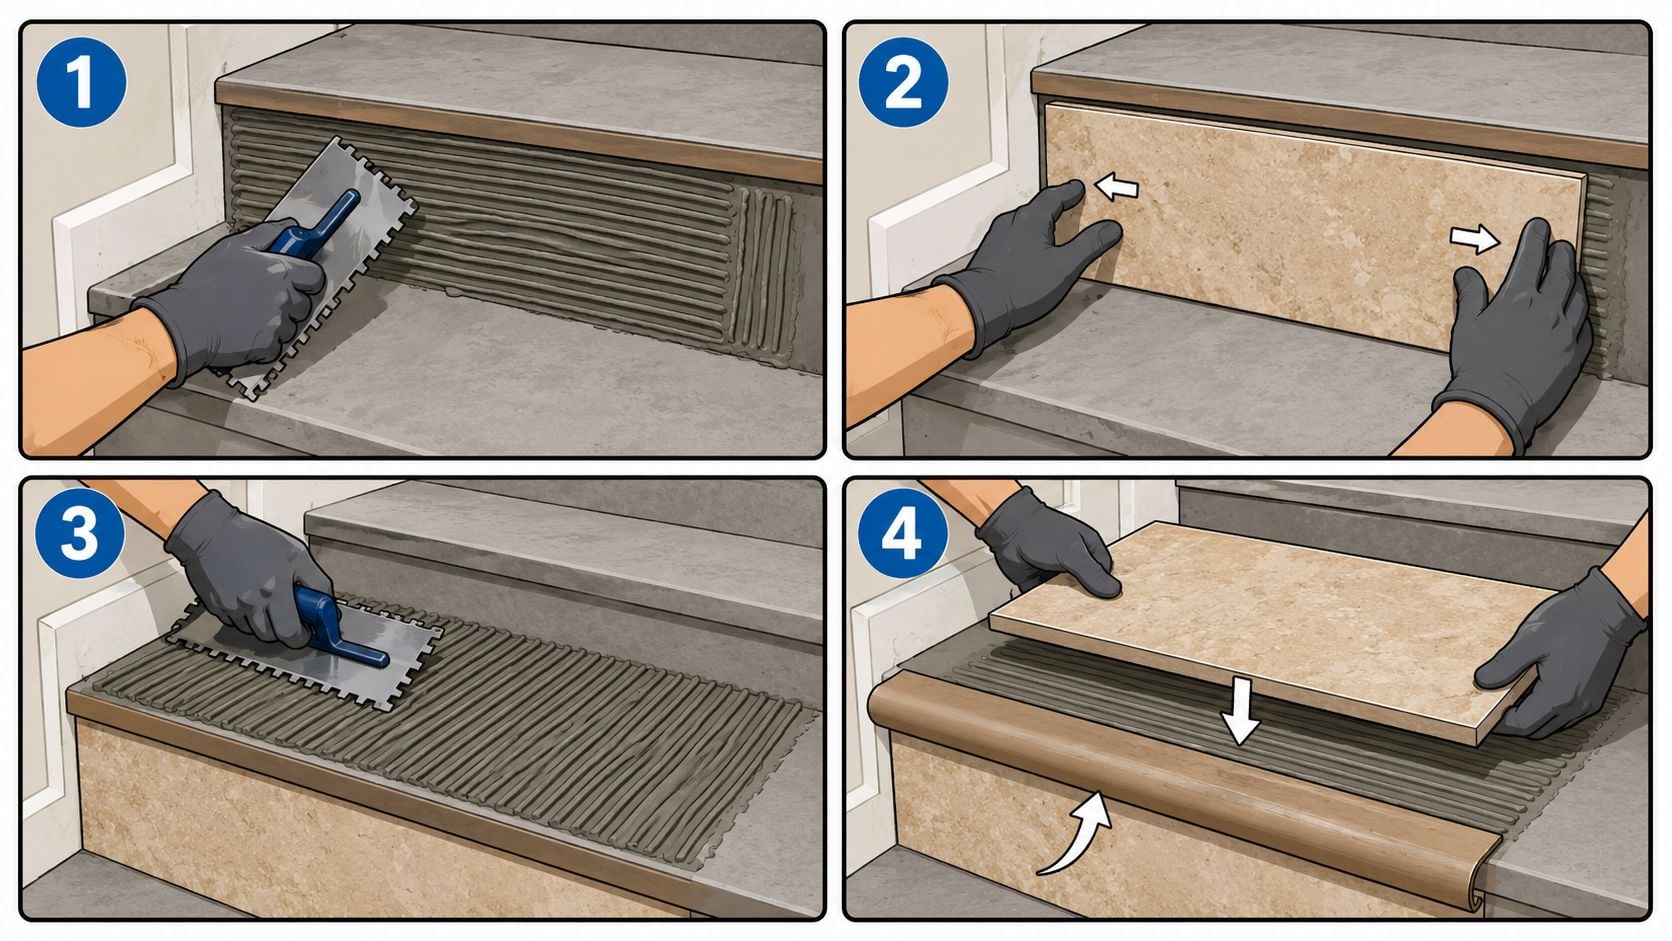
A Step-by-Step Guide to Tiling Treads and Risers
Once the substrate is right, the setting work has to stay disciplined. Stair tile isn't a place for improvising as the project goes.
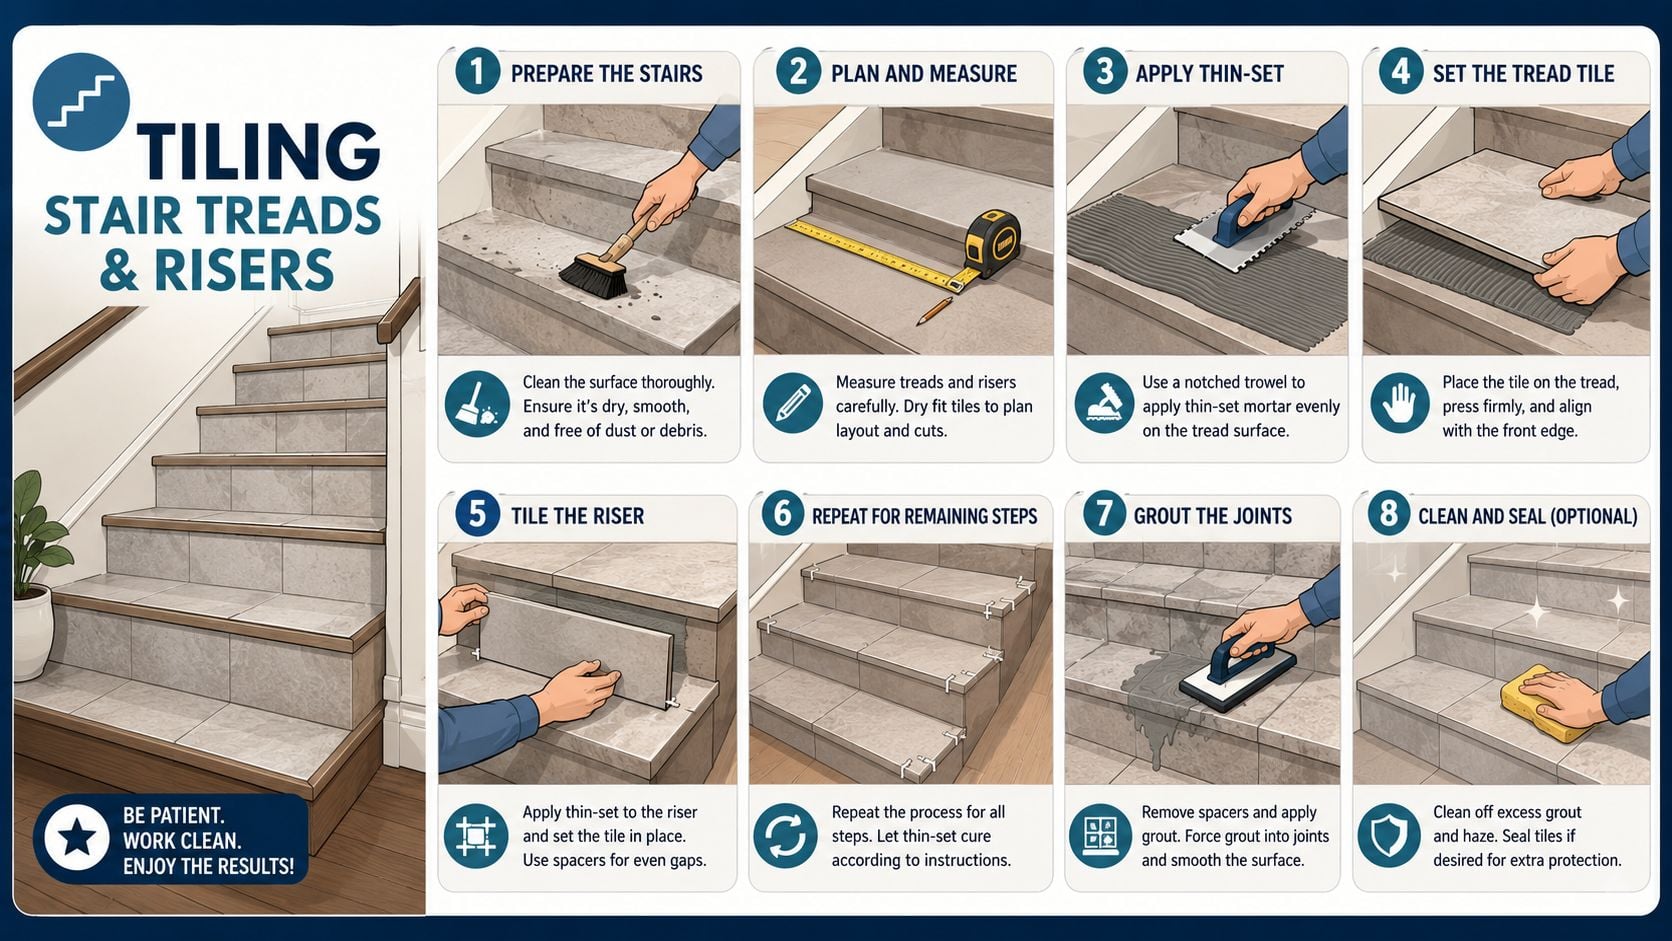
Layout Comes Before Mortar
Dry layout saves rework. Before mixing thin-set, the installer should confirm tile placement, edge alignment, overhang treatment, and where cuts will land on both the treads and risers.
A clean approach usually follows this order:
- Check each tread and riser for variation.
- Establish a consistent visual line so the finished staircase doesn't wander.
- Confirm where the nosing or trim will terminate.
- Plan cuts so skinny slivers don't end up in obvious spots.
On some projects, looking at choosing outdoor step components can help homeowners understand stair part terminology and edge-piece logic, even when the installation itself is indoors.
Setting Treads and Risers Without Hollow Spots
The technical goal is full support. Hollow areas, weak corners, and inconsistent mortar contact often lead to the failures people blame on the tile itself.
Rubi's discussion of tile installation problems points out that separation and bulging are often system failures tied to uneven surfaces or poor adhesive technique, not proof that the tile was bad in itself (Rubi on tile installation problems).
That's why careful installers focus on the mechanics:
- Use properly prepared thin-set: Mortar has to be mixed and handled for strong bond, not spread after it has started to lose workability.
- Work with full coverage in mind: Stairs don't tolerate casual spot bonding.
- Set into fresh material: Tile should be placed into wet, workable mortar so it can bed fully.
- Support larger pieces correctly: Back-buttering larger tile helps eliminate unsupported voids.
- Check each edge: The front of the tread and the corners deserve special attention because they see the harshest use.
A common sequence is to tile the risers in a controlled pattern, then set the treads so the edge treatment remains crisp and repeatable from one stair to the next. The exact order can vary with the stair design and trim system, but consistency matters more than speed.
A staircase can look straight from across the room and still feel poorly installed underfoot. Sound, edge support, and alignment matter just as much as appearance.
Cuts also need patience. Corners, sidewalls, and visible edges will expose rushed work immediately. On stairs, a slightly rough cut doesn't disappear into the room. It stays at eye level every day.
Grouting Sealing and Finishing for Safety
A stair job isn't done when the last tile is set. The finish work protects the installation and affects how safe the staircase feels in daily use.
Finish the Joints Correctly
Grout has to be chosen and applied with the stair's actual surface in mind. Highly textured tile can trap residue if cleanup is rushed. Narrow joints need different handling than wider ones. The goal is clean, full joints without haze left on the tile face or weak spots left in the lines.
The finishing stage should include:
- Consistent joint packing: Voids in the grout line can collect moisture and dirt.
- Careful cleanup: Stairs show haze quickly because light catches every tread.
- Attention at edges and transitions: Nosing lines and side terminations need a neat finish, not smeared grout and rough wipe marks.
Sealing can also matter, especially for grout lines and for tile surfaces that benefit from added stain resistance. The exact sealer choice depends on the tile and grout selected, but skipping this step often leads to harder cleanup later.
Safety Does Not End When the Tile Is Set
If the staircase still feels slick after installation, the job isn't functionally complete. Clear traction treatments, grip additions, or stair treads may be worth considering, especially for basement stairs, back entries, and family-heavy routes.
That kind of practical maintenance thinking isn't very different from other hard-surface upkeep. Homeowners who already follow basic hardwood flooring care tips will recognize the same principle. The finish lasts longer when the surface is cleaned regularly and protected from tracked grit.
The final check should be simple. Walk the stairs in socks, in shoes, and under normal household conditions. If the staircase feels uncertain when slightly dusty or damp, it needs more safety attention before it should be considered finished.
Care Costs and When to Call a Professional
A tiled staircase often looks low-maintenance on day one. In an older Capital Region home, its true mettle is shown after a wet winter, a muddy spring, and another season of the house expanding and settling. That is when small problems show up first at the stair nose, in the grout joints, or along the edges where tile meets wood trim and walls.
Routine care is simple, but it needs to be consistent. Fine grit acts like sandpaper underfoot, especially on the front edge of each tread. Water tracked in from snow or a damp basement can leave the surface slick and can work into weak joints if the installation was marginal to begin with.
Daily upkeep should focus on a few basics:
- Sweep or vacuum often: Grit reduces traction and wears the stair edges faster than many homeowners expect.
- Clean spills and tracked-in moisture quickly: Wet tile is less forgiving on stairs than on a flat room floor.
- Inspect grout lines and nosings: Hairline cracks, loose trim, and small chips usually start at high-impact points.
- Use a mild cleaner: Soap-heavy products and harsh chemicals can leave residue that makes stairs feel slippery.
Cost is where many stair projects change direction. The tile itself is only part of the bill. Labor rises fast when an older staircase needs substrate repair, rebuilt tread edges, custom nosing, or moisture correction near a basement entry. A straight, stable set of stairs is one job. A staircase in an older Upstate New York home with bounce, seasonal movement, or past water exposure is a very different one.
That is also the point where professional help stops being optional and starts making sense.
A capable DIY homeowner may be able to handle a small, unusually stable stair project. I would not recommend taking chances with stairs that flex, show uneven riser heights, have painted-over damage, or sit above a damp basement. Those conditions lead to cracked grout, loose tile, and unsafe edges. On stairs, failure is not just cosmetic.
Tip Top Furniture & Mattresses is one practical local resource for homeowners in Freehold, Albany, and the wider Capital Region who want flooring guidance that fits the rest of the home. That matters when the staircase needs to coordinate with adjoining rooms and when the project budget has to account for more than surface materials.
A good tile stair installation can last well and clean up easily. A bad one becomes noisy, slick, and expensive to fix. In older homes around Albany and the Capital Region, the difference usually comes down to whether the structure, moisture conditions, and safety details were addressed before the first tile was set.
For homeowners in Freehold, Albany, Schenectady, Troy, and across the Capital Region, the smartest next move is to get the staircase evaluated before choosing a finish. Visit the Tip Top Furniture & Mattresses showroom to explore flooring options that coordinate with the rest of the home, ask about design support, or review flexible financing for a larger remodel.