Cleaning a Memory Foam Mattress: A Guide from Your Local Experts in Freehold, NY

When you invest in a great night's sleep with a high-quality, USA-Made mattress from a local expert, the last thing you want is for a spill to ruin it. Protecting that investment starts with knowing the right way to clean it. The number one rule? Never soak memory foam. Its unique, dense structure is like a sponge—it traps moisture, which can lead to permanent damage and even mold growth. The key is always gentle, targeted cleaning with as little water as possible.
Why Memory Foam Needs a Special Cleaning Approach
If you've bought a new mattress recently, there’s a good chance it's made of foam. The global market value for memory foam is projected to hit over $7.3 billion by 2030, and it now makes up roughly 45% of all mattress sales. It’s clearly the material of choice for comfort, but that comfort comes with a unique cleaning challenge.
The very thing that makes memory foam so comfortable—its dense, absorbent cellular structure—also makes it tricky to clean. As your neighbors in the furniture business since 1978, we want to share our expertise so you can keep your mattress in top shape.
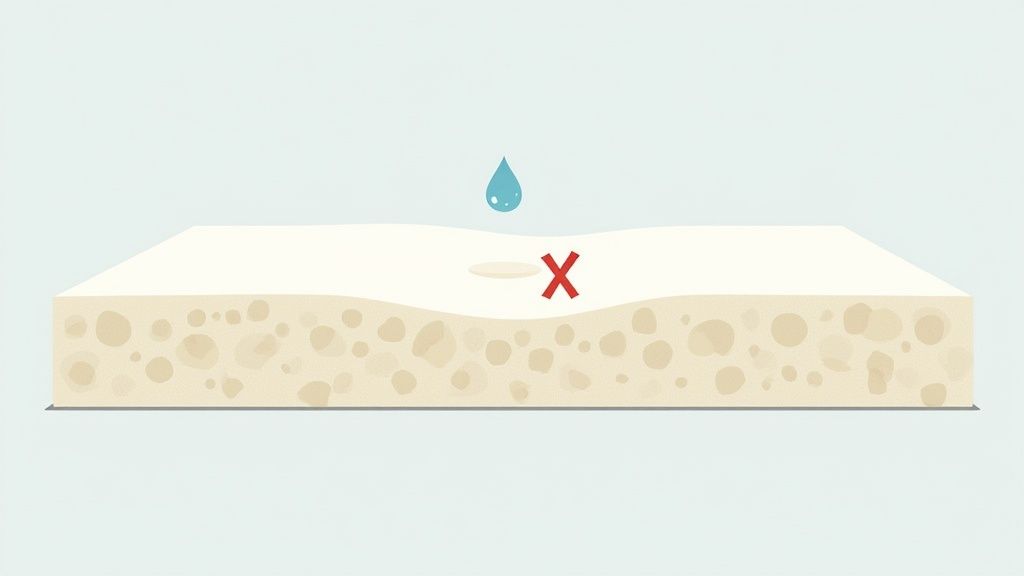
Unlike a traditional spring mattress with plenty of open space for air to move, memory foam traps liquids deep inside its layers. Once moisture gets in, it’s incredibly difficult to get it all out. This creates the perfect damp, dark environment for mold and mildew to grow, which can ruin the mattress and even impact your health. It’s a common concern we hear from our customers right here in the Greater Albany Capital Region.
The Science Behind the Foam
This material, first developed by NASA, is "viscoelastic." That means it has properties of both a liquid (it flows slowly, conforming to your body) and a solid (it's elastic, so it bounces back to its original shape). Harsh chemicals like bleach, ammonia, or strong detergents can actually break down this delicate structure. Over time, that causes the foam to lose its supportive qualities and even start to crumble. If you're curious about how we got from straw beds to space-age foam, you can learn about the history of mattresses from straw mats to memory foam.
At Tip Top Furniture & Mattresses, we’ve been helping local families since 1978. The single biggest mistake we see people make is cleaning their memory foam mattress like it’s a traditional one. Gentle, mostly dry methods are always the answer to making sure it lasts for years.
Because memory foam is so sensitive, you just need to remember these golden rules:
- Use as little liquid as possible. Always dampen a cloth lightly—never pour any cleaning solution directly onto the mattress.
- Avoid harsh chemicals. Stick with mild, pH-neutral cleaners or simple homemade solutions with a little bit of vinegar and water.
- Ensure it’s completely dry. This is non-negotiable. Good air circulation is critical before you even think about putting sheets back on.
To make things even easier, here’s a quick reference guide to keep on hand.
Memory Foam Cleaning Dos and Don'ts
This table sums up the most important rules for safely cleaning your memory foam mattress without causing damage.
| Action | Why It's Important |
|---|---|
| Do blot stains immediately | Prevents liquids from seeping deep into the foam. |
| Don't use bleach or ammonia | These harsh chemicals can degrade and break down the foam's structure. |
| Do use a mild, diluted detergent | Gentle cleaners won't damage the viscoelastic properties of the foam. |
| Don't saturate the mattress | Excess moisture leads to mold, mildew, and permanent damage. |
| Do allow it to air dry completely | Prevents moisture from getting trapped, which is the #1 cause of mold. |
| Don't use a hairdryer or heat | Direct heat can damage the foam and cause it to lose its shape and support. |
| Do use a mattress protector | The best defense is a good offense! A protector stops most spills from ever reaching the foam. |
Following these simple guidelines will keep your mattress fresh, clean, and supportive for a long, long time. It's all about working with the material, not against it.
Gathering Your Gentle Cleaning Toolkit for Albany Area Homes
Before you tackle a stain, getting your supplies in order will make the whole process smoother. We've been in this business since 1978, and if there's one thing we've learned, it's that harsh chemicals like bleach or ammonia are the absolute worst thing for memory foam. They'll break down the foam's structure in no time, so it’s best to stick with simple, effective things you probably already have.
The name of the game is "gentle." You want to lift out stains and kill odors without hurting the delicate viscoelastic cells that make memory foam so comfortable. Luckily, most of what you need is likely waiting in your kitchen or laundry room.
Your Essential Cleaning Supplies
Here’s a quick rundown of what to grab. Having these supplies ready means you can work quickly and efficiently.
- Vacuum with an Upholstery Attachment: This is always your first move. It gets rid of all the surface-level dust, pet dander, and crumbs, giving you a clean slate to work on.
- Mild Laundry Detergent: Go for a simple liquid detergent, preferably one without a lot of dyes or perfumes. You'll only need a tiny bit mixed with water.
- Baking Soda: This is a miracle worker for odors. It’s a natural deodorizer that pulls out moisture and neutralizes smells without any harsh chemicals. A must-have for any household.
- Distilled White Vinegar: A fantastic, natural stain remover, especially for those tougher, set-in spots. When you dilute it, it's just acidic enough to break down stains without being too aggressive on the foam.
- A Few Clean, Soft Cloths: You’ll need at least two or three. One for dabbing on your cleaning solution and another for blotting the area dry.
- Spray Bottle: Don't skip this. A spray bottle lets you apply your cleaner as a fine mist. The biggest mistake people make is oversaturating the mattress, and this little tool prevents that perfectly.
For tougher biological stains like sweat or urine, it's worth understanding what an enzymatic cleaner is and how it works. These cleaners are designed to break down the specific proteins in those types of stains, making them incredibly effective while still being safe for your mattress.
Tackling Stains and Odors on Your Mattress
Life happens. Whether it's a spilled cup of coffee in bed or a little accident from a pet, stains don't have to mean the end of your memory foam mattress. The key is knowing how to handle it correctly.
With our 45+ years of experience helping families across the Greater Albany Capital Region, we've learned a thing or two about saving a mattress. The most important rule? Act fast, but be gentle. Never, ever scrub a fresh stain—that just grinds it deeper into the foam's delicate structure. You want to lift the stain out, not push it further in.
First Things First: The Initial Prep
Before you even think about a cleaning solution, you've got to clear the surface. Strip everything off the bed—sheets, mattress protector, pillows—and toss them straight into the wash.
Next, grab your vacuum and use the upholstery attachment to go over the entire mattress. You’ll want to pay close attention to the seams and any little crevices where dust, pet hair, and crumbs love to gather. This step is crucial; otherwise, you'll just be making a muddy mess when you start spot cleaning.
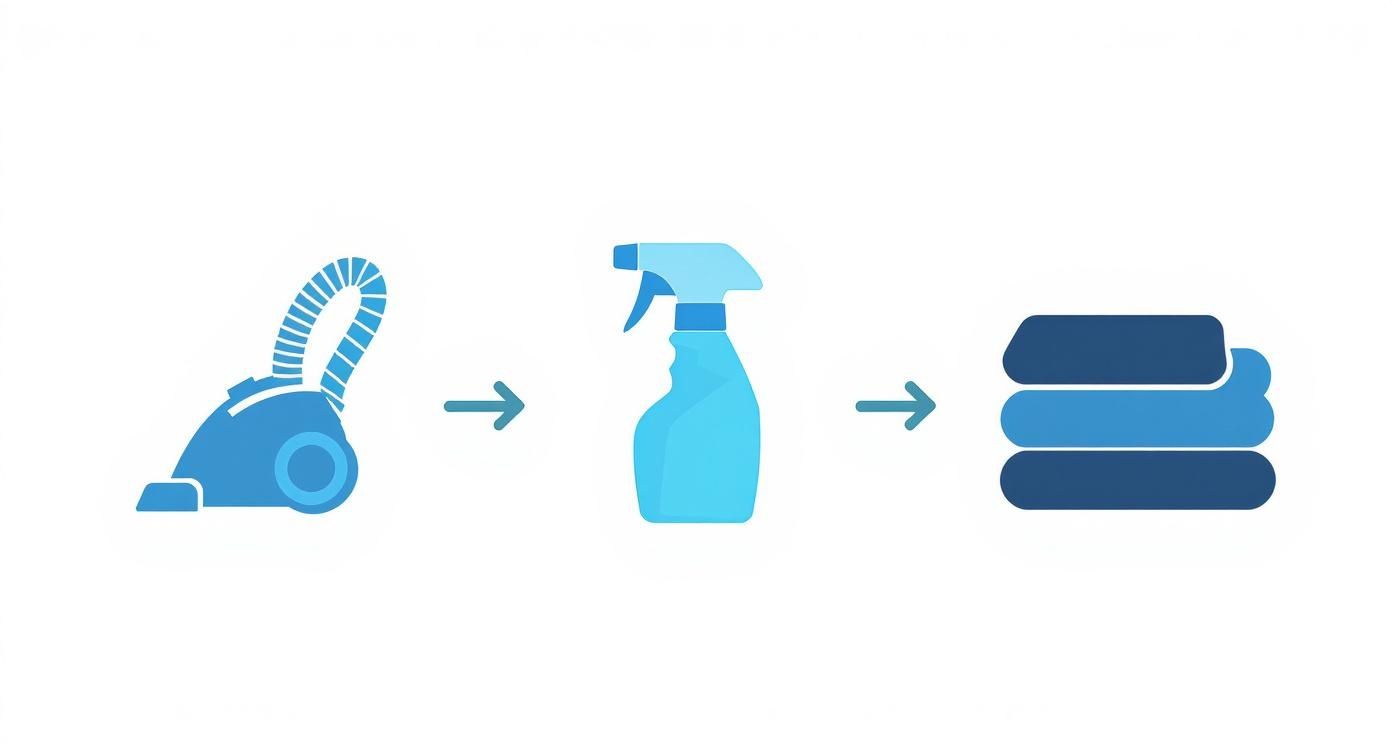
As you can see, it's a simple process. The right tools—a vacuum, a gentle spray, and clean cloths—are all you need to clean your mattress without causing any damage.
The Gentle Art of Spot Cleaning
When it comes to common spills, a simple homemade solution is your best friend. Forget about harsh chemical cleaners, as they can eat away at the memory foam.
Here’s a gentle cleaner you can make right in your kitchen:
- Mix about one teaspoon of mild liquid laundry detergent with one cup of cool water.
- Pour your mixture into a spray bottle. This gives you way more control.
- Lightly mist the stained area. The goal is to dampen the surface, not soak the foam through.
Once you’ve sprayed the spot, take a clean, dry cloth and start blotting. Always work from the outside of the stain inward to keep it from spreading. Press down firmly to soak up the moisture and lift. You'll literally see the stain transferring from the mattress onto your cloth.
Our Pro Tip from the Freehold Showroom: Keep switching to a clean, dry section of your cloth. If you keep using a soaked part of the rag, you’re just putting the stain right back where it came from. A little patience goes a long way here!
For a deeper dive into different types of spills, check out this a practical guide on how to clean mattress stains.
Eliminating Lingering Odors with Baking Soda
Sometimes, even after the stain is gone, a faint smell remains. This is where good old baking soda comes in. It's a natural wonder for absorbing moisture and neutralizing those pesky odor-causing particles.
Make sure the spot you cleaned is just slightly damp, then sprinkle a generous layer of baking soda over the whole area. Don't be shy! For the best results, you need to let it sit for at least 8 to 10 hours. Letting it work its magic overnight is even better.
The next morning, vacuum it all up. Use your upholstery tool and go over the spot several times from different directions to make sure you get every last bit of powder. Your mattress should be back to looking and smelling fresh. This trick can save you a bundle; professional mattress cleaning averages around $130.
Following these steps will get you through most mattress mishaps. And for more tips on keeping your bed in great shape for years to come, take a look at our guide on mattress maintenance and cleaning tips to extend its lifespan.
The Critical Step of Thoroughly Drying Your Mattress
If you take only one piece of advice from this guide, let it be this: never, ever put sheets back on a damp memory foam mattress. It’s a recipe for disaster. Moisture trapped deep inside that dense foam is the perfect breeding ground for mold and mildew, which will absolutely ruin your mattress and can even impact your health.
After any cleaning, getting your mattress 100% bone dry is non-negotiable.
This part of the process just requires a bit of patience. Depending on how much water you used and the humidity in your home, it could take a few hours or even a full day. Rushing this step is the single biggest mistake we see homeowners make, from Albany right down here to Freehold.
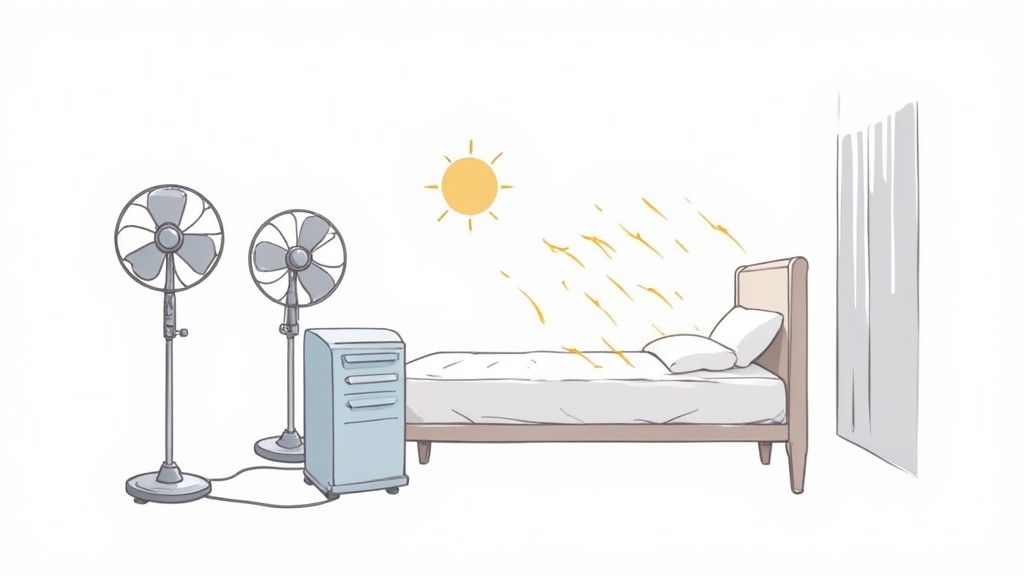
Harnessing Air and Light for Effective Drying
Your goal is simple: get as much air as possible circulating around every single surface of the mattress. This isn't the time for shortcuts. You need to create an environment where moisture has no choice but to evaporate.
Here are the most effective techniques we’ve been recommending to our customers for over 45 years:
- Create a Wind Tunnel: Open up the windows to get a nice cross-breeze going. Then, point one or two fans directly at the mattress to keep that air moving constantly.
- Use a Dehumidifier: For anyone in the Capital Region, dealing with a humid New York summer is just a fact of life. A dehumidifier is your secret weapon here. It will actively pull moisture from the air, and by extension, right out of your mattress.
- Bring in Indirect Sunlight: If possible, move the mattress near a sunny window. The UV rays from the sun are a natural disinfectant. Just be careful—avoid direct, intense sunlight because it can degrade the foam over time. Gentle, indirect light is perfect.
The growth of the professional cleaning industry shows just how important proper care is. The global mattress cleaning service market is valued at around $2.5 billion—a number that proves how many people understand the need for a truly clean and dry place to sleep.
The One Thing You Should Never Do
It can be really tempting to grab a hairdryer or a space heater to try and speed things up. Please, resist this urge. Direct, high heat is the absolute enemy of memory foam.
Applying concentrated heat from something like a hairdryer can literally melt and warp the foam's delicate cellular structure. This causes permanent damage, creating hard spots and completely ruining the contouring support you paid for.
It is so much better to wait a few extra hours for it to air dry properly than to risk destroying your mattress in a matter of minutes. While you're waiting, it’s a great time to brush up on other mattress care tips to keep your bed cool and clean all summer long.
Once it’s completely dry to the touch—and we mean completely—you can put on your mattress protector and fresh sheets, confident that your bed is truly clean.
Proactive Tips for Long-Term Mattress Protection
You’ve put in the work to get your mattress spotless—the last thing you want is to be scrubbing out another stain next week. Honestly, the easiest way to deal with spills and stains is to stop them from ever reaching the foam in the first place. A little proactive care goes a long way in keeping your mattress fresh and supportive for years to come.
Think of it like this: you wouldn't leave a beautiful piece of Amish furniture out in the rain. Your mattress deserves the same protection. A small investment now saves a ton of effort and potential damage down the road. It's the same trustworthy advice we've been giving families right here in the Greater Albany Capital Region for decades.
Your Mattress's Best Friend: The Protector
If there's one piece of advice we can't stress enough, it's this: get a high-quality, waterproof mattress protector. It's the single most important accessory for your bed. It’s a non-negotiable shield against spills, sweat, dust mites, allergens—all the realities of daily life.
And forget those old, crinkly plastic sheets from back in the day. Modern protectors are soft, breathable, and so comfortable you won't even notice it's there. It creates a barrier that stops liquids cold, buying you precious time to clean up a mess before it can soak into the delicate memory foam. If you want to dive deeper, you can learn more about the hidden benefits of a mattress protector. It’s the easiest win in any mattress care plan.
Creating a Healthy Sleep Environment
Beyond a good protector, a few simple habits can make a huge difference in keeping your mattress in pristine shape. These are the little things that really add up.
- Rotate, Don't Flip: Most modern memory foam mattresses, especially our USA-Made mattresses, are built with comfort and support layers on top. You should never flip them. Instead, give your mattress a 180-degree spin every three to six months to ensure everything wears evenly.
- Provide a Solid Foundation: The right bed frame is crucial. It doesn't just support you; it also allows for proper air circulation underneath, which is key to preventing moisture buildup. A sagging or poorly constructed base with slats spaced too far apart can actually damage the foam and even void your warranty.
- Regular Vacuuming: Even with a protector on, it's smart to give the mattress surface a quick vacuum every couple of months when you change the sheets. A simple pass with an upholstery attachment will pick up any dust and allergens that might have settled.
As a family-owned business serving our neighbors since 1978, we believe in a complete sleep system. The mattress, protector, and foundation all work together to give you the best possible rest. Investing in quality from the start is always the most affordable option in the long run.
Building that perfect, long-lasting sleep setup doesn't have to break the bank. We offer flexible payment plans to help make your dream bedroom a reality. You can apply for flexible financing now and invest in quality sleep without the financial stress.
To help you stay on top of things, we put together a simple schedule.
Weekly, Monthly, and Yearly Mattress Care Checklist
This simple checklist breaks down mattress care into easy, manageable tasks. Following it will help keep your bed clean, supportive, and comfortable for years.
| Frequency | Task | Benefit |
|---|---|---|
| Weekly | Wash all bedding (sheets, pillowcases) in hot water. | Removes body oils, dead skin cells, and dust mites. |
| Monthly | Vacuum the mattress surface with an upholstery attachment. | Eliminates dust and allergens that can accumulate over time. |
| Every 3-6 Months | Rotate the mattress 180 degrees from head to foot. | Promotes even wear and prevents premature sagging. |
| Yearly | Inspect the foundation for any signs of sagging or damage. | Ensures your mattress is getting the proper support it needs. |
Staying consistent with this routine is the best way to protect your investment and ensure a great night's sleep, every night.
Answering Your Memory Foam Cleaning Questions
With over 45+ years of helping families in the Greater Albany Capital Region find their perfect mattress, we've heard just about every question you can imagine. Here in our Freehold showroom, we believe our job isn't done after the sale. That's why we've put together answers to the most common questions we get about cleaning a memory foam mattress.
Can I Use a Steam Cleaner on My Memory Foam Mattress?
We get this one a lot, and the answer is a hard no. You should never use a steam cleaner or even just hot water on memory foam.
Think of memory foam as having a delicate, sponge-like structure. The intense heat from a steam cleaner combined with all that moisture is a recipe for disaster. It can permanently break down the foam's cells, ruining its ability to contour to your body and provide support.
Worse yet, forcing steam deep into the mattress creates the perfect damp, dark environment for mold and mildew to grow—something that's nearly impossible to get rid of once it starts. It’s best to stick with the gentle, low-moisture methods we've already covered.
How Long Does It Take for a Memory Foam Mattress to Dry?
Drying time really depends on a few things: how much cleaning solution you used, the humidity in your home, and how much air is circulating in the room.
- A lightly spot-cleaned area might feel dry to the touch in just 3-4 hours.
- A more thoroughly cleaned mattress will likely need a full 24 hours to dry out completely.
It's absolutely critical that the mattress is 100% dry before you even think about putting sheets back on. To be on the safe side, we always tell our customers to let it air out for a full day. Open a window, turn on a fan, and give it plenty of time.
What Is the Best Way to Remove Urine Odor?
For stubborn organic smells like pet urine, you don't need a fancy cleaner. A simple homemade solution works wonders. Start by mixing equal parts white vinegar and water. Gently blot this solution onto the affected spot—the key is to blot, not scrub, and be very careful not to soak the foam.
Once you've blotted the area, cover it generously with baking soda and let it sit for at least 8-10 hours. Overnight is even better. The baking soda is a powerhouse; it will draw out any leftover moisture and neutralize the uric acid that causes that lingering smell. The last step is to grab your vacuum's upholstery attachment and vacuum up all the baking soda.
Of course, keeping your bed fresh is about more than just the mattress. For tips on the rest of your sleep setup, take a look at our guide on how often you should change your sheets.
At Tip Top Furniture & Mattresses, we want you to love your mattress for years to come. If you're ready to upgrade your sleep with a high-quality, USA-made mattress, visit us online at https://tiptopfurniture.com or stop by our Freehold, NY showroom today. We are proud to serve the entire Capital Region, including Albany, Schenectady, and Troy.
